Sunday, March 28, 2010

Polka Dot Piggy Bank

Found this little pink piggy bank at the Dollar Tree. Cute, but plain. My daughter and I went through my scrapbook paper scraps and punched a bunch of 1" circles. I am always trying to figure out how to use my paper scraps. We then Mod Podged them to the bank. Simple as that!

Fun, quick and easy craft to do together. The bank also has a plug on the bottom, so we don't have to break it to get to the booty.


Linking up to the following,

giveaways

Saturday, March 27, 2010

Frugal Scrapbooking Secrets

I really enjoy scrapbooking. I don't have the time for it that I'd like, but I really love doing it when I can. I have "first year" baby books for all three kids pretty much done and am moving onto individual "memory" books for each of them. We take a fair amount of pictures, so I'll be busy for quite some time. I used to really get discouraged at how far behind I was or how my books didn't measure up to others. But I've really tried to adopt the attitude that these are "memories" for our kids, not trophies.

One problem with scrapbooking (besides the time element) is cost. It can be SO expensive! All the doo-dads one can get, you can end up spending a fortune! Trying to do scrapbooking on the cheap is a little tricky, but it can be done. Especially if you learn some secrets and start thinking outside the box. Let me share some of the few secrets I know. I would also love it those reading this could post some of their "secrets" in my comments, I'm always on the lookout for new information!

This LO I just completed last night. My son has a special buddy who is moving away. Our church is compiling a scrapbook to give to the family. This is our contribution. I would say that this LO cost roughly $0.25 for me to fabricate. Yep, $0.25 cents! See...scrapbooking can be frugal and fun at the same time! Honest, it wasn't hard or time consuming either. Let me tell you what I did.

First off, learn to journal!! Seriously, I've seen so many scrapbook pages where there is little to no journaling on the LO. Journaling does two things. One, it preserves memories and specifics about the event that you'll forget in a few years. Two, it takes up space! Seriously, learn to journal. My kids LOVE reading what I've journaled on their pages as much as the actual pages themselves.

Print large pictures to add to your LO's when you can. We have a fairly good photo printer. I specifically bought it with scrapbooking in mind. Yes...I know that printed pictures from a printer at home don't last as long as "professional prints" but they last nonetheless. Also, again a bigger picture takes up more room on your LO and it adds variety. It's fun to see different sized pictures on your pages.

Add special, personal touches to your pages. I had my son draw a picture of him and his buddy to add to my LO. How many of us have a thousand few pictures that the kids have drawn lying around the house? Use them! Put them in your LO's, they add so much to them. Not to mention, they take up room on the page!

Make your own embellishements when you can. Fabric flowers, felt embelishements, buttons, ribbons can all be whatever from wherever. Buttons are buttons, they don't have to come from the "scrapbook" section. Fabric flowers can be used from the floral section at your local dollar store, just snip off the plastic backing to flatten them out for use. Felt is felt, you can cut out whatever shape/design you need. Ribbon is much cheaper in the floral or sewing section than in the scrapbooking section. Jewels, rhinestones, etc. from the notions department are cheaper too, just use a dab of glue to affix them. Learn to look for things in other departments or repurpose them from your own home (think outgrown clothing even!).

Shop around for your materials. Papers, embellishments, etc are everywhere. Don't become store or brand loyal, that costs you. I buy my things wherever I can. Everything that I used in this LO came from Big Lots. I bought two $2 scrapbooking "grab bags" and all that you see here was in those bags. Plus, I only used a small amount of what was in those bags. I can easily make 4-5 complete LO's with what is left over plus extra. Some of my favorite places to look for scrapbooking materials are Big Lots, Dollar Tree, Target's dollar spot, Wal-Mart and garage or rummage sales. Also, make sure to use your 40% coupons at the craft stores whenever you can. My craft store that I frequent also takes competitors coupons so I make sure to use them whenever I buy.

My last suggestion is to hold "scrapbooking stash swaps" when you scrapbook with friends. Bring items you no longer need or like and swap items with your friends. That way you get rid of things you aren't using, and come home with new things for FREE! This is always fun as you will come home with something for nothing, and there is nothing more fun than that!

Have fun preserving those memories! Linking up to the following:

BWS tips button

Decor Mamma

Friday, March 26, 2010

GFCF Peanut Butter "Dough"

This is a very kid friendly recipe. Peanut butter "dough". Super, super simple. Three ingredients. Peanut butter, honey and powdered milk or GFCF powdered milk replacement (I use this particular milk replacement, it's awesome!). Start with peanut butter, as much as you want to use. Then add honey and powdered milk/milk replacement to taste. Basically you want the consistency of playdough.

Sometimes I roll the dough into balls, sometimes I let the kids play with it and then eat it. Super good, healthy and no fuss. Sometimes we roll the balls in coconut or mini chocolate chips. We've stuck almonds in the middle before too. What can you do to yours? Wouldn't crushed pretzels be super yum?!?

Wednesday, March 24, 2010

Bevy of Beautiful Birdies

So in going with the trend, my house has lots of little birds living in it right now. Until a few months ago, the only birds in my house were the roosters in my kitchen. Not any more. Now there's a yellow duckie in my bathroom, a new rooster friend in my kitchen and two little birdies have made a home in my living room.

They all were kinda blah and boring when they came here, so I "bathed" them in some paint and how cute and cheery they became! Much better. Let me share my bird bathing techniques with you so your little birdies can sparkle too!

This little guy came to us from the Dollar Tree. He was cute to begin with, blue and yellow feathers and these super cool metal wire legs/feet. However I thought he could be even more special. So I bathed him with a coat of Kilz semi-gloss in "Antique White" and glazed him with a 3/1 paint to water solution. I used acrylic nutmeg brown paint to make the glaze. I think that all cleaned up he looks great, his new top matches his cute little bottom much better.

The rooster also came home to us from the Dollar Tree. He was this yicky pale yellow with a dingy brown coat of dust all over him. Not very pretty, but don't tell him because I don't want to hurt his feelings!

I "bathed" his feathers in some Color Place spray paint in "Fire Red" and then glazed him with a bit of acrylic metallic brown glaze. Much better. He looks right at home with the other rooster fellows that are already calling my kitchen home.

This little gal also came home with us, she too was lonely and neglected at the Dollar Tree. She was a homely little thing, she looked so pale and sad when she got home. I first learned of her plight by seeing what another lady had done with her little birdie that she brought home here.

To "bathe" her I mixed up some white and grey acrylic paint and painted her a really light grey. Then I mixed some white and metallic green acrylic paint and gave her a "mottled" overcoat. I wanted her beautiful feathers on her wings to really shine, and I think they do now. She was so special that she needed a very special "nest", so I found a special transferware saucer and she now calls it home. In fact, she loves it so much she never leaves!


Linking up the the following,


Funky Junk's Saturday Nite Special


Keeping It Simple

Making

Tuesday, March 23, 2010

Coat Turned Toy Closet

Three kids six and under. Yep, you guessed it, toys toys toys. However our house is just under 750 sq feet, no that isn't a typo. Space is a premium is the understatement of the century. We had a coat closet that just wasn't getting used enough to warrant keeping it. Since we rent, I couldn't do any permanent changes but wanted to repurpose it for our needs. So, for around $20 I outfitted it as a toy closet. Let me show you how.

First, I bought two wire shelves from Wal-Mart. I want to say they were $8 or 9 each. They are made for closet storage and they stack on each other. I put them on top of the top shelf in our closet. As you can see in the picture, there was a fair amount of room between that top shelf and the ceiling of the closet. Maximize the space as much as possible. It also helps to keep a huge stack of boxes falling on you when you are trying to pull something out.

I'm still figuring out how to get the most use out of the actual closet bar. I have a bag hung from it now, but I want to get more from it. For now this is how it looks.

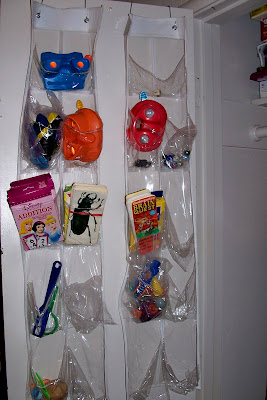
On the door I hung two bathroom organizers that I purchased from the Dollar Tree. Perfect for little things. Seriously love them. As you can see a few pockets have broken, but since they are from the Dollar Tree it's no biggie to replace them (so why haven't I!).

I scored these two plastic storage drawers from Freecycle. However most of us have a few of these around the house that aren't being used to full potential, so repurpose them here. They stack really well, just put heavier stuff on the bottom to keep them from getting top heavy. The cassette storage on top I picked from a free pile in front of someone's house.
The blue bag has several puzzles in it. I put puzzles in ziploc bags and just cut out the top of the box. Much less space taken up that way and those puzzle boxes never hold up long.

So that's it...toy closet on the WAY cheap. As you can see, I even still have room to add to it if I want too. However I'm a big believer of rotating toys, so we'll see if that happens. If you don't have an entire closet available think of other options. Even just hanging the bathroom organizers over the back of your closet doors will net you lots of little storage pockets.

Linking up to the following,

 http://linda-coastalcharm.blogspot.com/

 http://www.thethriftyhome.com

Sunday, March 21, 2010

Losing the "Me, Myself and I" Mentality

I've been struggling with "dying to myself" as a wife, mother and most importantly a child of God. Time and time again I've heard, "Don't forget to take time for yourself" and that being a Mom makes us as women put our own needs on the back burner. I hear conflicting messages of "me time" and "martyrdom", both in the secular and Christian worlds. What is the way to go, where should we as mother's be pointing our compasses?

We as mothers are called to give of ourselves, completely and wholly to our families. I feel that God wants me as a mother to give all of myself, to not hold any of it back. Now do I do it? Nope, not even close. Much of it I reserve, for various reasons. Mostly because I struggle with, “But what about me?” Truth be told, it’s not about me. God wants my life to be all about everyone else but me.

I see parents who make the mistake of putting their children’s needs on a pedestal, every whim and want attended to. All decisions made with the child in mind. I don’t think that is the way to go. Kids absolutely need to understand that they are part of a family, not the only one in it.

I see parents who make the mistake of putting their children’s needs on the back burner. Parents who take the “me time” thing to the extreme, teaching their children that personal wants and desires come before others. Parents who have a hard time closing the chapter of the “life before kids”. Again, kids need to be “along for the ride” but not at the expense of selfish wants.

What I want for my family, what I truly struggle with is allowing GOD to be first. Not the kids, not hubby, not me, not others. Him. Allowing Him to speak to my heart, to guide my intentions and itinerary. Letting my children see what an intimate, dependant and co-existence looks like with God as center. I don’t do this, not even close. I let God look through the window, sometimes invite Him in for awhile, but to allow Him to be the leader of our family? Nope.

Raising small children brings amazing amounts of work. Tiredness, frustration, exhaustion, questions and more. I have three kids six and under, I get that. However I know that God wants me to give of myself completely each and everyday, to not hold any of it back, even for myself. He wants me to fill my well so I can pour it out completely each and every day. He wants me to fill my well with Him, not just “me time”.

I’m reminded of when Moses was leading the Israelites through the desert and God provided them Manna. He told them to take just what they needed each day, not more not less. To eat all they took, but just one day’s worth at a time. Then on the sixth day, He told them to take enough for two days so that they would have food for the Sabbath. Those that didn’t take it didn’t eat. Those that took more than two days worth saw their extra provisions rot. Those that followed His wishes and took enough for just two days and ate it all had no issues. God wants us to do it all, EVERY day. He wants us to depend on Him to give it all to us, each and every day. I try and store it up, knowing full well if I don’t use it all up it’s going to rot. It’s happened time and time again.

It’s so hard to wrap my mind around the concept of giving of myself completely, not worrying about the “me” of it. But I’ve seen so many times how God has filled the broken, desperate and lost with more than they thought they could hold. If that is possible, then I know that if I put God as the priority in all of my roles then I don’t need to even worry about whether or not I’ll have the reserves to do it or what the future will look like once the "Mothering" season has passed.

Thursday, March 18, 2010

Displaying Your Child's Artwork

As the case with most parents, we have lots of "works of art" in our house. My kids are no different than others in that they love to draw pictures or as they call them, "art projects". Most of them don't end up being preserved for all eternity, but I do want my kids to know we appreciate their efforts and that their pictures are special.

My son came home with the above picture a few weeks back. I loved it, I don't know why but I thought it was especially special. So I framed it, in a polished silver 8x10 frame no less. Now normally I wouldn't do that, but this picture fit almost perfectly and I didn't have a 8x10 lying around that I was ready to frame at the moment. I love how it looks, and my son is thrilled that "Mommy really likes my picture".

The other thing I like to do is hang their pictures on the kitchen cabinets. Pretty good area to work with, and since my cabinets are plain and need a pick me up why not? Since they are painted with semi-gloss, that tape lifts right off with no issues at all.

I dream about having beautiful framed pictures for my walls. Or having their pictures hang from a "real" art display. I will probably do that one day. But for now, this will do. It doesn't have to be perfect, just get the job done. This does it beautifully.

Wednesday, March 17, 2010

Coupe Soup Candleholder

I found this really cute iridescent glass shade at Goodwill for 99 cents. It reminds me of the glass shades that you use with ceiling fans that have light fixtures. It's a pretty tan color with that awesome iridescent finish. I had found this cute "vintage" coupe soup bowl at an antique mall awhile back and paid a whopping 99 cents for it too. I love the pattern, I'm a sucker for pretty much all things transferware.

I was going to glue the bowl down to the glass shade, but decided not too so that I could use the pieces for other uses if I wanted to. Besides I wasn't too worried about it being unstable, since the bowl is larger than the shade it's pretty solid. I used two different ribbons to tie around the top of the glass shade. The top wasn't very pretty, so I wanted to hide it.

All in all I think it turned out pretty cute. Like the uniqueness of it and I'm glad that I didn't glue them together so that I can use them for different things at a later date.

Linking up to the following,

Funky Junk's Saturday Nite Special


Keeping It Simple

DIY Day @ ASPTL

Creations by Kara

Decor Mamma

Monday, March 15, 2010

Burner Cover Chickie Sign

Why am I calling this my "Burner Cover Chickie Sign"? Well, I made the sign out of a stovetop burner cover. Yep, I really did! On my last trip to the Dollar Tree I was overcome with a burst of creativity and saw a two pack of burner covers to which I thought, "Boy, those would make a perfect base for a circular sign". So I grabbed a pack and went home and got to work, this was the result!

I stole some of my daughter's lined writing practice paper, that is was I used to cover the sign. I cut it into strips and just randomly placed them over the cover with matte Mod Podge. Using strips worked really well, made it very easy to cover the sides. I used some chipboard embellishments, fabric flowers, rub-ons, ribbon and tulle to finish it off. The "chickies" are a downloaded graphic from The Graphic Fairy.

I used the above stamp, which I thought was perfect on a piece of cardstock and used foam to float mount it. The gold sparkly ribbon edging is absolutely perfect in my opinion, I love how it looks. I just hot glued the pink tulle in loops to the edge and then cut each loop with scissors to give it the spiky, frayed look.

I am just WAY happy with the overall finished product. Looks vintage and fun for Easter without being overly "Bunny Rabbit Easter", do you know what I mean? I'm linking up to the following:


Creations by Kara

giveaways

Decor Mamma

Thursday, March 11, 2010

Five Ingredient Peanut Butter Chocolate Perfection


Ok...this is the real deal. Puff pastry, cream cheese, confectioners sugar, chocolate chips and peanut butter. Five of the best ingredients there are in my humble opinion, melded together into one perfect dessert. I made these last night, there are two left as of right now. They are that good. So easy to make, let me tell you how.

Take a 8 oz brick of softened cream cheese and add 1/2 C confectioners sugar and 1/2 C peanut butter (smooth or chunky) and blend well. If you using a "natural" type of peanut butter (no sugar added), I'd increase the confectioners sugar a bit. Spread mixture evenly over a sheet of premade puff pastry (I used Pepperidge Farms brand). Make sure you use puff pastry NOT phillo dough. Leave about a 1/2" border around the puff pastry. Then sprinkle about 1/3 of a bag of chocolate chips over the top.

Starting at one end, roll up pastry dough making a "log". Cut it into twelve even pieces and arrange on a cookie sheet. Either spray your sheet, line it with parchment paper or use a Silpat. Bake in a preheated 375 oven for about 30-35 minutes, until tops are browned. Store in airtight bag or container.

These are so incredibly good. They kinda remind me of a Palmier. Flaky, sweet but not too over the top. If you try them, let me know what you think!


Linking up to the following,

Beauty and Bedlam