Saturday, February 27, 2010

Soda Bottle Cloche

I've been enamoured by all the awesome cloches I've been seeing lately. So super cute. I've personally never owned a cloche. With my three kids, I thought it was a recipe for disaster. If only they made a non-breakable cloche. Hmm.....

So...what if I told you I made the adorable (I think so anyways) cloche below from a Diet Coke bottle? Would you believe me? Well, you should because I did! I took the bottle and washed it and removed the label. I ran into a speed bump right off the bat, I couldn't get all the label off. There was a small strip of label stuck to the adhesive and it wouldn't budge. Since the labels are plastic, I didn't think soaking it would work. So, I broke out the hair dryer and used it with a butter knife to carefully scrape off the rest of the label. It worked perfectly. Goo Gone got off the rest of the adhesive. If there is ink on the bottle then use nail polish remover to get it off.
I glued a stack of cute buttons to the top of the soda cap, that is my "finial". I picked buttons that would be pretty neutral and could be used with a variety of items for when I want to change the item on display.
I took white ribbon and wrapped the neck of the bottle. I had to use some hot glue to help hold the ribbons in place, since otherwise they tended to slip around. I also was sure to cover the neck completely, including the little ring under the top of the bottle lid/cap.
I just so happened to have a pillar holder that works perfectly as a stand. Plopped my little chicken on top and covered with my non-breakable cloche! Yea....so happy. I think that it's adorable as can be. I love the price tag even more...FREE!

Perfectionists beware....this isn't as good as a real honest to goodness cloche. Usually soda bottles get little creases/lines in them as they are being used. Occasionally they'll get a scratch or two. Personally I think it's cute and adds to the "patina" and makes it look a bit worn and loved.

Linking up to the blogs listed under the "Linky Parties I Love" tab on the upper right.

Thursday, February 25, 2010

Spring Fling Felt Wreath

So we're starting to get little glimpses of Spring around here. Some trees are starting to bud. We're starting to see more sun. In fact, last week I was able to wear a short sleeved shirt for the entire day! So since the weather has been slightly starting to turn, it inspired me to rummage around my craft stash and try to make something "Springish" for the house.
I had bought these wire/mesh butterflies awhile back for a project for my daughter's room. While I haven't completed the project, I did use one of the butterflies. As you can see, she is decorating a felt wreath that I made. I used a pearl head stick pin to attach her to the foam wreath base.
I had lots of scrap remnants of felt that were given to me. I picked out the lightest colors I could find, which ended up being pink, tan and white with gold polka dots. I pinked strips of them, about 6 inches long and then wrapped the wreath with them. I alternated the colors, but did a pattern of sorts. I didn't overlap them perfectly (as you can see) but I'm still happy with the overall result.
I had some ivory organza ribbon and some pink grosgrain ribbon, so I layered them "Nester" style and will hang the wreath that way. I like how the two ribbons look together, it's a bit more than just using one or the other.
Overall, think she turned out pretty cute. Used a foam wreath base from the Dollar store. Everything else I already had on hand, total grand cost was $1!! Yea for Spring....I'm ready for you (even though my allergies aren't).

Please click "Linky Parties I Love" on the right to see who I'll be sharing my project with.

Saturday, February 20, 2010

Cinnamon Stick Votive

Awhile back, I saw a vase at a store that was wrapped in cinnamon sticks. I'm pretty sure they had it out for Christmas. It was adorable. They used those really long cinnamon sticks, which would have cost a fortune to replicate. So I filed it away in my "I'll make it someday" file in my little 'ol brain and left the vase in the store.

A few weeks ago, I was digging through a crafting tote of mine and came across some small cinnamon sticks that I had bought for another purpose and didn't end up using. My wheels started turning, and I decided to try and replicate that vase I saw earlier with them. Then, I remembered that I had the other votive that I didn't end up using when I made this

Turns out those sticks were almost the perfect size for the votive I still had. So I hot glued them around the perimeter of the votive holder, and trimmed the tops to give them a somewhat uniform look. Then I took some jute string and wrapped the base with it. The sticks were just a little too short, so that was my solution. I didn't really like the look of the plain jute, so I mixed up a bit of craft paint and painted the jute to more closely match the cinnamon sticks.

Looks pretty cute lit, don't you think? I'm also going to use it as a little accent vase, I think it would look cute with flowers too. I had everything on hand, didn't end up having to buy a thing! If trying to replicate it, look at the dollar store. You'll find everything that you need there.

Friday, February 19, 2010

Miserable Mommy (oh...the rest of the house is sick too)

The entire household is sick. All three kids, Hubby and me. Yuck. The kids have been sick for a week and a half. Needless to say it's wearing on me.

DD has been running a high fever on and off for the past few days. The highest it's gotten so far is 104. She doesn't get sick often, but when she does she doesn't mess around.

Lots of juice, popsicles and whining in this house for the past several days. I'll be thankful when everyone is better, which I am hoping and praying is going to be real soon.

I've managed to not get sick until yesterday, which I feel is a pretty big feat. I'm not as sick as they are. I've been gulping vitamin C powder, GSE (grapefruit seed extract) and cranberry or orange juice cocktails three times a day for two days now. I think it's keeping me from going over the edge and getting really sick. At least, I'm hoping.

Wednesday, February 17, 2010

Delicious Day Old Bread Casserole

Oh baby, this is good stuff. It's one of those recipes I love. Easy, cheap, simple and it uses up leftovers!! Oh, this is a goodie. Want the recipe?

Ok, before I divulge it you must know something about me. I'm not big into the whole "recipe" thing. I rarely if ever use them (unless it's a baked good or GFCF). I'm one of those, "pinch of this, dash of that" type cooks. Great for the fact that it usually brings out unique and varied foods, bad when you want to replicate them exactly. So below is the best guess I can give you for a "recipe" for this deliciousness. But if you want to tweak it a bit, be my guess. I would do it!

"Delicious Day Old Bread Casserole"

*this tastes best when allowed to rest overnight in the fridge before baking the next day*

3/4 loaf of stale bakery bread, cut into 1" cubes (Dutch Crunch is what I used. However you could use French, Wheat or whatever you have on hand)

2 packages of chopped spinach, thawed and drained completely

1 med/large white or yellow onion, medium mince

3 cloves of fresh garlic, minced finely

5 large eggs, beaten well

1 to 1 1/2 cups of milk (if your bread is extra stale I'd use the latter)

Celery salt, Italian seasonings, red pepper flake and black pepper to taste

1 whole container (32 oz) of plain yogurt (I used Mountain High, super good stuff)

1/4 cup Parmesan cheese (I used the can kind...I know)

1 1/2 cups shredded cheese (I used a sharp white)

Ok, this is what I did. Saute the onion in a bit of oil until translucent, then add garlic and saute another few minutes. Add spinach, combine all well and saute for a few minutes more. Place sauteed mixture in a bowl to cool.

Take your cubed bread and place it in a greased 9x13 or 11x14 pan. Basically you want your pan nice and full, but not overflowing. Then take the cooled spinach mixture and place evenly over the bread. Then sprinkle the Parmesan cheese over everything.

Take the yogurt and add your desired amount of the seasonings mentioned above and combine well, then dump it evenly over the top of the spinach/Parmesan cheese. Then cover with the shredded cheese of your choice.

Combine the eggs and milk in a bowl then pour over the top. Take a spoon and "mix" it all up well, making sure the egg/milk gets incorporated into the rest of the ingredients. Cover it well, then put in the fridge overnight so that the bread can soak up everything really well.

To bake, tent with aluminum foil and bake in a 400 degree oven for 30-40 minutes. When the casserole has set in the middle (stick a knife in the center, if it's clean it's set), remove the foil and bake an additional 10-15 minutes or until the top is nice and brown.

Awesomeness....it's even better the next few days. It also freezes really well!!

Linking up for the first time to "Look What I Made Day" over at Creations by Kara:


Creations by Kara

Also linking up for the first time to:


Beauty and Bedlam

Tuesday, February 16, 2010

Picture Perfect Earring Holder

Ok, here's my take on the cute picture frame earring holders I've been seeing all over blog land. I've finally gotten past the "yanking" baby stage with my kids and can now wear dangling earrings and not just studs anymore. Yea for me!

A very sweet friend bought me an awesome stack of glittered scrapbook paper for my b'day this year. I picked out the sheet above, cut it to size and used spray adhesive to apply it to the cardboard backer of the picture frame.


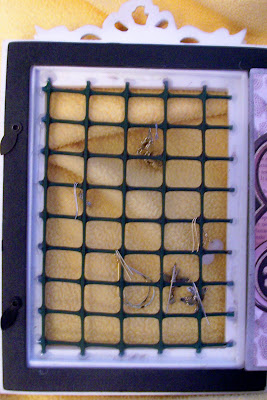
I used my hot glue gun to affix plastic grid fencing (I had it left over from another use) to the inside of the front of the frame. The fencing was a lovely shade of grass green, so I spray painted it brown before using it.


Finished product, I think it turned out pretty cute! I think I still want to tweak it a bit, maybe add some cute ribbon or something to the front. The fencing material is really rigid, so it works really well for the earrings to hang from. And, since I already had everything on hand I spend exactly $0 on this project!

Linking up to Tatertot's Weekend Wrap Up Party:


Saturday, February 13, 2010

Finally Finished

So, a few months back I wrote about a piece of art I was working on here . I finally got around to hanging it up today. Wow, I amaze myself with my lightening fast follow through.

I hung it a bit differently that I originally planned to, but I really like how it turned out.

This will be the first thing I see when I open my eyes each morning (well, more than likely anyways).

I'm in a linky mood today, so I'm going to link up to SNS again. http://funkyjunkinteriors.blogspot.com/

Friday, February 12, 2010

Skewer Sunburst Mirror

So, I love all the cool sunburst mirrors I've been seeing on various blogs. Really cute, love the fact that they can be DIY. So, decided to try it. I wanted mine to be a bit different though.

I wanted mine to have "beads" on it. I've seen them on actual honest to goodness vintage mirrors and really liked the look. Think it adds just a bit more to it. So, set out to figure out how to replicate it myself.

But let me go in order of how my pics loaded, okay? So this is what I did. I took an old CD (sorry Shawn Mullins, your days are over) and hot glued the skewers to it. When I was done, I took another CD and made a "sandwich" of sorts. Plus, you can use the hole in the CD as a hanger for your mirror. Super easy!

BTW, check out the wedding section at your local craft store for the mirrors. I found mine there, a two pack and they had beveled edges. They were packaged as "candle chargers". Less than $5 total for the two of them w/my handy dandy 40% off coupon.

To get the beaded look (if you want too), slide plastic pony beads onto the skewers. I used two different sizes, to vary the look a bit. I used jumbo skewers, so this worked really well and I didn't even have to hot glue the pony beads in place. You might have to use a bit of force to get the beads to slide, but it can be done. If the skewer is a bit long, you can cut the end off or leave it like I did.Before attaching the "skewer sandwich" to the mirror I spray painted it. Those skewers are thirsty and suck up the paint, so if you don't prime them (like I did) then you'll need several good coats. Also, the pony beads to need to be sprayed well so the colors don't show through. I didn't spray both sides completely as you can see but I did spray the beads from the front and back.

Total cost? Under $5! Used less than a pack of the skewers (from the dollar store), a few random pony beads (I raided my daughter's stash), the mirror was $2.5o and I used about 3/4 of a can of spray paint that was $1.97. Not bad at all I say!

Linking up for the first time to Funky Junk Interior's Saturday Night Special: http://funkyjunkinteriors.blogspot.com/

and to Kimba's DIY Tuesday: http://asoftplace.net/


giveaways

Thursday, February 11, 2010

Personalized Art Kits for Kids

This Christmas, I made my daughter her very own personalized art kit. I took one of those prefab art kits for kids, the ones you find every holiday season at pretty much any store for around $5. They are great! I buy one every year, that is about how long they last.

I wanted to make it extra special this year, so I decided to personalize it for her. I took poster board and cut it to fit the front of the kit. I then took just a small amount of my huge stash of scrapbooking stuff and went to town. I wanted it to look girly and cute. Plus, with my daughter the pinker the better.

I made sure to write cute sayings and such to inspire the little artist in her. But, I don't need to inspire this kid much...she'd draw on any flat surface in the house if I'd let her.

I glued it all down to the poster board with a glue stick, then went over everything with a good layer of Mod Podge. Once dry, I finished off the border with some ric-rac and grosgrain ribbon. Then I used my hot glue gun and heavily glued the backside of it and attached it to the art kit.

If it makes it semi-intact 'till next Christmas I'll be thrilled. So far it looks ok, considering she's used it probably 20 times since she got it.

I bought several kits and have them set aside, I see some birthday gifts for a few of her friends being made by yours truly in the near future. That with a nice pad of drawing paper, what a great gift that'll definitely be used. I'm all about the consumable gift lately.

Linking up to Kimba's DIY Tuesday: http://asoftplace.net/


Linking up for the first time to "Strut Your Stuff Thursday" at Somewhat Simple:
giveaways
BWS tips button

Wednesday, February 10, 2010

Valentine-ish Votive Holder


So I've had a set of clear glass square votive holders for forever. You know the ones, they are at every dollar store in the United States. Normally I'd use them at Christmastime, but I wanted to figure out another use for them.

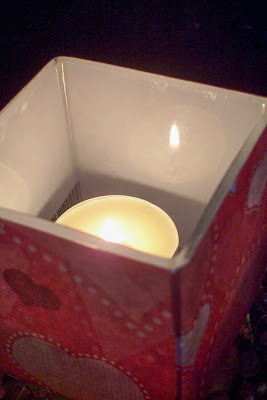
I had some scrap pieces of scrapbook paper with a cute Valentine feel, so I used the scraps and made the above cute little votive holder. I simply Mod Podged the pieces directly to the votive holder, simple as pie.

I had a beaded candle ring that wasn't being used so I set the votive holder on top and it makes it pop all the more. Super simple, super cheap and that's the way I like it.

Word of caution, see how you can see the barcode from the scrapbook paper faintly above? Make sure you don't use that part of the scrapbook paper since when it's lit the paper takes on a bit of a transparent quality. But on the other hand, don't you love how the solid white back of the paper looks on the inside? Makes it look almost like cased glass to me.

You could make many variations for different holidays. What a great way to use up extra scrapbook paper too!

Please click on "Linky Parties I Love" on the right to see who'll I be sharing this project idea with.

Monday, February 1, 2010

Hand Dipped Chocolate Caramels


Make a sweet for your sweetie this Valentine's day. How about hand dipped chocolate caramels? Couldn't be simpler, honestly!!

Buy some chocolate melting disks (I like Guittard's best), Kraft caramels, and some various toppings. I used toasted coconut, sea salt and non-pareils for mine. Melt the chocolate according to manufacturers directions, dip the caramels until completely coated and top. See...super easy!

I bought cake boxes from the wedding section at Joann's for my candy boxes. Larger and much cheaper than candy boxes. Cut parchment paper to fit, and shredded some red and pink tissue paper to pad the box. Put my candies in little paper cups, filled the box and then tied off the top with some organza ribbon and a cute heart sticker.

Cut some cute scrapbooking paper or cardstock to decorate the outside of your box. I cut a small section of grosgrain ribbon and glued it to the top of the box, then added a cute layered sticker. Your love will appreciate your loving gesture, go and make some (make sure you buy too much so you have to eat the leftovers, don't forget to share with the kids!).

Linking up to Kimba's DIY day: http://asoftplace.net/ and Hoosiers Homemade Valentine's Party!: http://hoosierhomemade.com/