Monday, May 31, 2010

Budget Botanical Baby Bum Balm

All three of my kiddos had super sensitive skin as babies. We went through lots and lots of Desitin, diaper rash abounded. I used cloth diapers pretty exclusively when they were really young, and while it helped they would still get bad diaper rash on a pretty consistent basis. On a whim, I bought a tube of Burt's Bee's diaper ointment. Miracle cream I tell you, it seriously worked like magic. No more diaper rash! But at $9 a tube, it was an expensive miracle and after several tubes I decided to try and make it myself.
So I read the label on the back of the tube to get an idea of what all was in it. Seemed like it was fairly easy stuff to get my hands on, a few things required a trip to the health foods store but not hard to find.

I bought tea tree oil, calendula oil, lavender oil, vitamin e and vitamin a capsules, jojoba oil and a few tubes of diaper cream. Yes, my initial investment was more expensive than just buying a tube of cream. But you use very small amounts of each, and all the essential oils (tea tree, calendula and lavender) have a myriad of other uses. Make sure you buy "essential" oils and not fragrance oils either, as fragrance oils are cheaper and not make for cosmetic use.

I took two tubes of diaper cream and placed it in a bowl. I bought the off brand at Target, get the highest percentage of zinc oxide you can, the higher the better. I added 4 drops of tea tree oil, 6 each of the calendula, lavender and jojoba oil and five capsules each of the vitamin a and e oil. Mixed it all together and put it in a large opaque container with a screw top lid. Make sure your container is opaque (not see through) as light can't hit the cream or it'll break down the components.

I would say my initial investments of the "ingredients" (not including the diaper cream) was probably $30-$40. However I have made countless batches of this cream and still have plenty left. You can use tea tree oil as an astringent, disinfectant, shampoo additive (for dandruff) among other things. Just be careful with tea tree oil and boys, because it mimics the estrogen hormone if used in excess and we don't want that with our little guys. I've used the lavender oil as an additive in cleaning solutions, lotions and just for aromatherapy. The calendula oil can be added to petroleum jelly and used as a boo boo cream among other things.

I'm telling you, if your kids suffer from diaper rash this stuff is a must. Also, if you or you family suffer from heat rash or chaffing this stuff works wonders too. It also makes an AWESOME and much appreciated shower gift.

Click on "Linky Parties I Love" on the right to see what parties I'll be sharing my "recipe" with.

Click below to see a special baby related Linky Party at "Somewhat Simple":

SYS Thurs

Saturday, May 29, 2010

Card Art

I am a big fan of picture frames. I have a lot of them. I always enjoy keeping my eyes open for a new one when out and about. Pictures, in my humble opinion are one of the cheapest and most meaningful decorations one can have in their home. That being said, every once in awhile I like to mix it up and frame things other than pictures. The white frame above was found at my fave thrift store for $1. It is a heavy thing, it must be made from cast iron. I love the swirly, intricate pattern that it has cast into it. Very shabby and "nesty" (I know that isn't a word). I found these really cute blue note cards with a nest on them and thought they would look cute framed. The silver "grid" frame was on clearance at Target for $2. It's a pretty good size, I think it's a 5x7. I got a really cute birthday card this year from my Momma, part of which had the cute vase with flowers that you see above. I cut it out of the card and framed it, I think it looks great for spring/summer decorating. It looks right at home with my first project I made in HS ceramics and the framed picture my oldest colored awhile back, I wrote more about framing/displaying kids art here .

Start looking at cards for frugal frame worthy options. It's a fun way to add to your collection without breaking the bank. Click "Linky Parties I Love" on the right to see what parties I'll be linking up with.

Friday, May 28, 2010

Frugal Fresh Flowers

Want me to let you in on a little secret? How would you like to have beautiful, fresh, FREE flowers for your home? I don't know about you, but I really have come to enjoy having fresh flowers, but don't always like having to pay for them. Since I don't have flowers in my yard that are "vase" worthy, my free flower options are limited.


Ok, let me tell you what I do to get these beautiful FREE flowers. Number one, buy a pair of inexpensive but sharp pruning shears. Number two, put the pruners in your glove box or under seat storage in your car. Number three, when out and about and you see beautiful flowers in an EMPTY LOT or an ABANDONED PROPERTY ONLY, clip them. Viola, fresh FREE flowers! See, pretty easy!
Both arrangements were clipped from some overgrown plants at a home in our neighborhood that has been untended for years. There used to be an elderly lady that lived there, but she's been gone for a few years now and her once beautiful yard is now gone wild. These flowers were easily accessible from the sidewalk, I promise I didn't go trudging through her yard to get them.


I'm sure you've on more than one occasion seen pretty flowers on the side of the road, in an open field or another place that you've thought would look pretty on your kitchen table. Keep pruners in your car, and you can make your idea a reality!

Thursday, May 27, 2010

Stenciled Candleholder

Ok, I really do need to get better about taking "before" pictures when I redo something. So picture the below candleholder a yellowish pine color with lots of scratches and a solid black glass back. I found it at my favorite secondhand store, I think I paid $2 for it.


Originally I was going to paint the wood black and then replace the backing with some cute scrapbook paper. But when I popped the backing out I discovered the glass was actually painted black as in coated and it would have been super hard to remove it.

So plan b involved a stencil. I had a plastic flower stencil that I just taped down to the glass and painted on the flowers with leftover acrylic paint and a piece of sponge. The stencil was too large to completely cover the glass, so I just did three partial images and staggered them.


As you can see, the stenciling isn't perfect. Parts are somewhat blurry, it's not super crisp and defined but I like it that way. I used a gloss black spray paint, didn't prep the wood at all except to wash it well and let it dry before painting. Several coats of paint later and this is the finished product. I love it!

Click on "Linky Parties I love" on the right to see what parties I'll be linking up with.

Wednesday, May 26, 2010

Think Outside the Drawer

So I have a super tiny kitchen, as in really small. I have a very small countertop area that holds the sink, a dishrack, the coffee maker and my kitchen-aid. That is all I can fit on that countertop. That is the only one in the entire kitchen. I have a buffet turned work island in the center of the kitchen, but the only thing I have on it is a cutting board.

Our cabinets in the kitchen hang really low, so mounting appliances under them isn't an option. Besides the fact that we rent, and we can't make any changes anyway but work with what's already existing. The microwave and toaster used to be on another small buffet but it was white and had a TON of crevices and was a major pain to clean. Momma was at her breaking point and something new needed to replace it. My only requirement was that I didn't want it to be white and it had to have a somewhat easy to clean surface.
Meet the newest member of our family, the sideboard. I think I'll name her Sally. Sally sideboard is really a dresser that I bought off of Craigslist this last weekend for $80. I wish she would have been a little less, but she fits in our kitchen perfectly and she holds a lot of stuff.

She has ten lovely drawers, all but two are filled up with stuff. Right now I have my cuisinart, waffle maker, george forman grill, cookie cutters, cake decorating stuff, recipe book, blender, a few bread baskets and washcloths for cleaning up the kids tucked safely away inside her lovely drawers. Like I said, she holds a lot of stuff!

I had fun making the top functional and pretty. I had to have the microwave and toaster oven on top. But I also wanted to add some functional fanciness to it as well. The canister you see here is filled with paper napkins. It's sitting on top of a red antique devilled egg tray and the tongs for the toaster oven are within easy reach. Your going to give me a pass on my dirty toaster oven, right? That thing is a major pain to keep clean. Seriously, I love how it works but cleaning it is an almost futile endeavor.
The end of the sideboard was looking bare, as I didn't have any other appliances that HAD to go there. So I decided to borrow a lamp from the living room to give the kitchen some more light. I also wanted to add a decorative element, so I added the potted flower and the pictures. I just bought this Kalancoe plant from 99 cent everything the day before and it looks awesome here. I found some moss growing in the backyard so I dug it up and brought it in, makes the flowers look professionally potted, huh? The pot saucer is an old transferware bread plate that I got for 99 cents awhile back.

Both of the white picture frames came from 99 cents everything as well. If you have that store in your area and you've not gone, you are committing a frugal felony! That is hands down the best dollar store I've been too. Anyways, I wanted to frame something that would be meaningful for me. I spend a TON of time in the kitchen (as most Mommies do) and I need the encouragement. So I framed my favorite picture of me and my Momma, every time I look at that picture I smile.

I also made a frame with a word that I've really been trying to put into perspective as a Mom lately, "Legacy". Anything and everything has the potential of being the building blocks of the legacy I will leave for my kids. They are at an age now that makes me very aware of how my actions will leave a lasting impression. I have a lot of work to do in that area, I need the reminder daily, sometimes hourly, that what I'm doing day in and day out is really contributing to the overall larger picture.

Please click on "Linky Parties I Love" on the right for the blogs that I like to party with and will be linking up to.

Tuesday, May 25, 2010

Unexpected Blessings

This is Patches. When I first met her she went by a different name, Devil Cat. Back when she was "DC" she was our neighbor's cat. She hissed, she yowled, she pooped in our yard. I did not like her. For me that is a rarity, for I am a self professed cat person. Growing up we always had a cat as a pet. There was Kitty, Jezebel, Precious, Arthur, Cloudy, Socks, Tiny and Tigger just to name a few.Our neighbors moved out (another unexpected blessing!) but "DC" stayed. At first I thought they were coming back for her, but eventually they stopped coming back and I knew they had abandoned her. After a few days I went and bought cat food, I couldn't stand for even "DC" to starve. I seriously thought about calling the animal shelter, but with all the foreclosures in our area, they were overwhelmed with animals and I knew what would happen. I couldn't bring myself to do that, even to "DC".
So I fed her for several weeks. But in order to do this, NO ONE could be within 50 yards of this cat or she wouldn't eat. I am seriously not overexaggerating. Our laundry room overlooked the backyard, and if she was in the backyard trying to eat and I even opened the garage door to get to the laundry room she would freak and split. Seriously skitty kitty.
After 3 or 4 months, she finally started calming down. I could look out the window and watch her eat. Then I could stand at the back door and watch her eat. Then I could open the back door and stand in the back yard and watch her eat. Then I could walk up next to her, eventually petting her. Then she'd start coming to me. But all of this didn't happen quickly, it took another 3 or 4 months until she was completely comfortable with me. Lots of little baby steps, "DC" was one traumatized kitty and gaining her trust wasn't an easy task.
Once she was comfortable with me she'd start hanging out all the time. In the front yard, on the porch, under the big bush out front when it was hot. She's first scat when the kids came outside, but eventually she'd hang around. Occasionally she'd let them pet her, but when all three came at her she'd get scared and take off or give them a warning swipe. Never hurting them though.

A good year went by while we worked on building a relationship. "DC" became Patches, the new name fitting her softening and blossoming personality. She has been with our family for about a year and a half now, fully trusting and the best cat ever. This is not an overstatement. She sleeps with the kids (well, she's not supposed to but she sneaks in there sometimes). She sits on the couch with me for hours watching TV. On Sunday mornings when we let her in (she sleeps in the garage) the first thing she does is look for me and if I'm still in bed, she joins me.

She is the most patient cat with our children. They choke hug her. They pick her up and lug her around. They dress her up. They've locked her in the bathroom or a closet on more than one occasion. They've made her play "cops and robbers" with them (guess who is the one in jail?). They treat her like kids sometimes treat their pets and she has never not once gotten even. She'll give them a warning swat or nip, but has never drawn blood. It's her way of saying, "That's enough guys".


What an unexpected blessing Patches is to our family. My Hubby would sometimes disagree as he's not a big cat person, but even he likes her most of the time. Lots of work to get her to the point she's at, but the reward has been better than one could have anticipated. There is not another cat on this earth that would be the way she is with our three hooligans. She is the best cat, period.

Baby steps, patience, giving grace, gaining trust, showing love, opening hearts, softening of spirit. Seems like a good parallel to remind us that not only are we as parents called to do this for our children but our Heavenly Father wants to do this for us. All we need to do is just open a small speck of our hearts to let the work begin.

Monday, May 24, 2010

Thank You Very Kindly

To Melissa from Those Northern Skies for graciously gifting me with "The Versatile Blogger" award. I am so appreciative, really thank you! My whole "vision" so to speak for this blog is not just crafting/decorating/diy ideas but more of a variety of projects, stories and insights on how to create "treasures" for ourselves and those we love. So I'm really humbled and excited to recieve this award, thank you!! So part of my acceptance of this award is to write seven "unknowns" about myself. I am not that mysterious of a person, but it's always fun to read quirky stuff about each other, right?

1. I don't have a dishwasher, I am the dishwasher (and my sweet hubby sometimes too).

2. When I was thirteen I got a little overzealous with a bottle of Sun-In and turned my hair a lovely shade of orange.

3. When I was five I prayed this prayer, "God, if you are real, please fill my cup back up with orange juice". I bet you know what happened, but there is no question whether God is real to me.

4. My youngest sister, who will be celebrating her sweet sixteen tomorrow has Autism. I've never known a more perfect sixteen year old than her.

5. I still can't whistle.

6. I only like using peppermint toothpaste, none of that weirdo "gel" please.

7. Once I passed out at work watching a safety video and had to be transported to the ER for observation.

Yep, super riveting stuff, right? Ok, now on to the fun part. I now get to award this to my favorite "versatile" bloggers. Here they are, in no particular order:

Gina at Not So Random Stuff

Thy Hand Hath Provided

Emily at Too Blessed To Stress

Dodge And Weave

Kaysi at Keeping It Simple

Take the time to stop by these lovely blogs, I hope you'll be inspired and will enjoy them as much as I do.

Sunday, May 23, 2010

Nifty Numbered Wall Rack

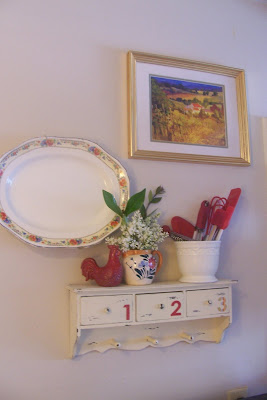
So I am totally enamoured with all the numbers I've been seeing in blogland lately. It's a really fun trend. I wanted to do something fun with this really cute wall rack that I snagged for a mere $4 from my favorite thrift store but didn't want really make it permanent. So I got the inspiration to use chipboard numbers from my scrapbooking stash instead, and they just so happened to be adhesive as well (big plus!).I love how it turned out. The colors really pop against the cream distressed finish (and it came that way too, I didn't have to do a thing but give it a bath). So fun, and it's a bit unexpected in my house.
The drawers are housing tea bags (in ziplocs of course) since I tend to drink lots of iced tea in the summer I thought that was a useful way to store it. This vignette is directly over my range, so it'll be very handy.

Everything I used to make this I already owned, with the exception of the wall rack. The large print on top was a score from a church rummage sale, I paid $1 (I luv it, my favorite print in my home). The platter was my paternal grandmother's, it's the only item of hers that I have. The red rooster was a homely thing that I transformed from the Dollar Tree (you can read about that here).

The white crock was an $1 repurposed plant pot (again from my fave thrift shop). I filled it with red kitchen gadgets that I already had. The floral pitcher was from my Dad's foster Mom, it's the only item of hers I have as well.

I'm not completely done yet. I'm looking for a picture of me and my maternal grandmother to frame and hang off one of the pegs. My fondest memories of her revolve around cooking and the kitchen. I though it would be a nice touch to have a picture of her to look at while I'm slaving away at the stove;) In all seriousness, it would be really special to me. Once I get that completed, I'll take an updated photo of the finished product.

This was really fun for me, I love how it brightened up an otherwise kinda boring view of the main wall in the kitchen. I'll be linking up to all my favorite linky parties, you can find their info under "Linky Parties I Love" on the right.

Friday, May 21, 2010

Monogramed Picture Collage

So I have this weird area of dead space in the kids "play" area in the living room. It's between a bookcase and a dresser and it's been in desperate need of something.I bought plain wooden letters from the craft store awhile ago for a use that I now don't remember. I painted the sides a cute shade of blue and mod podged them all with the same scrapbook paper. I have a lot of blue in the room so I wanted to try and pick something that would coordinate well.
I already had the clip frames, from IKEA. They are the cheapest and easiest frames, and I love how you can use them wherever because they'll go with whatever color palate you're working with.

I didn't even bother trying to hang them uniformly, because since they are easily accessible to little hands I knew they'd never stay that way. I kinda like the free form look anyways, a little unexpected.

Cute and cHeaP wall art, and I already had everything on hand which is always a plus in my book. Look under "Linky Parties I Love" on the right to see what lovely blogs I'll be sharing my creation with.

Monday, May 17, 2010

Scrappin' The Holidays

Today as I was perusing through Joann's, I was looking at all the random doo-dads that they already had out for the 4th of July. I'm telling you, it seems stores are putting out holiday stuff earlier and earlier.

I wasn't planning on buying anything, but then I saw some really cute star shaped rhinestones in red, white and blue. There were about 25 or so in the package, and they came with the foam dots as well, for $1! I didn't know what I was going to use them for, but at that price I snagged 'em up. I realized on the way out to the car that they'd be perfect for embellishments on a patriotic scrapbook page.
I've really been trying to think outside the box when buying for scrapbooking. I've started hunting around the notions department for ribbons, etc. I found several clearance ric racs and ribbons on sale for $0.25 a yard! I ended up getting several, they are really cute (but I'm too lazy to take a picture right now).
I also buy things on clearance to use later on. The fun little glittery foam shapes in the "harvest" layout were in the kids section at Wal-Mart awhile back for less than a dollar a sheet. They weren't made specifically for scrapbooking, but you'd never know it.

This Christmas LO was made with all clearance or markdown papers. There were a few different sets that I combined together to make it, they weren't all part of the same line. I even bought them at several different places. I was really happy with the overall result, and I'd say that the entire layout was under $0.50 to complete.

Scrapping holidays are always fun, they have such special memories attached to them. Remember to keep your eyes out while shopping for things to use to make your pages extra special. Remember, just because you don't need it right now doesn't mean you won't use it down the road. We all have lots of Thanksgiving, Easter and Christmas celebrations to look forward to.

Click on "Linky Parties I Love" on the right to see what awesome linky parties I'll be sharing my info with.

Thursday, May 13, 2010

Beaded Fab Flip Flops

Made these flip flops a few weeks ago with my Mom's group at church. They were fun to make, and pretty easy too. It's a great way to dress up cheap flip flops, or renew an older pair that you already have. Let me tell you what I did.


I took glass beads and wire (26 gauge I believe, straight out of the hardware department) and wrapped the plastic upper part of the flip flop. I tried to use the clear plastic cording that most people use when making beaded jewelry, but it was too hard to keep in place while wrapping the strap.

After wrapping the shoe with the beads/wire I took organza ribbon and wrapped the shoe with it, paying attention to cover as much of the exposed wire as I could. This is especially important on the underside of the strap, don't want that raw wire rubbing against your footie now! I also think it looks really cute, it finishes the look off nicely.

Doesn't that look great!?! So many possibilities. Plastic pony beads, buttons, glass beads, heck even just wrapping ribbon around the plastic upper strap would look cute.

To finish off the shoe I continued both the wire and ribbon all the way down to the bottom of the shoe, where the strap meets the foam bottom. I pushed up the bottom of the strap and slipped the wire and ribbon under it and wrapped it tightly a few times to secure.


I've even worn them a few times, they felt great. Now don't go jumping into the pool with these beauties on, but they will look great all summer long and you'll get lots of compliments on your cute shoes (I sure have). Fun craft to do with the kiddos too!


Click "Linky Parties I Love" on the right under "For Your Information" to see what fun parties I'll be linking up these fun flops to!

The In Between

Have you ever been there, the "in between"? In the middle, the chasm, the center? I'm there right now. Between two ideas, two notions, two possibilities. It's a really unsettling place. I don't like it.

I'm a fixer. A doer. A "make it all better" kind of person. When you are in the in between, you can't fix it. You can't make it go away. You just have to wait and see what side the pendulum is going to swing to. That isn't easy for me.

Trusting God while in the in between isn't easy either, not for me. As a "fixer" I want him to fix it. Make a decision, choose a side. Waiting to see makes me so impatient, I don't want to feel uncertain or unsure of what is next.

Giving it to God, allowing Him to choose the in between is what is hard. I want to choose it. I want to fix it. I want it to just be done already. Allowing God to make that choice is scary, I don't know what He's going to choose and more importantly, whether or not I will like His choice.

God uses the in between to mold us. To shape us, to pull us up towards Him. I need to be soft, like clay and weak enough to let Him mold me. He wants to use this in between to mold me to melt into His warm embrace.

Matthew 11:25-30
"Come to me, all you who are weary and burdened, and I will give you rest. Take my yoke upon you and learn from me, for I am gentle and humble in heart, and you will find rest for your souls. For my yoke is easy and my burden is light."

Wednesday, May 5, 2010

DIY Decorative Brads

So I've really been trying to get back into scrapbooking on a more consistent basis. Great because I'm getting things in my books. Bad because I'm staring to run out of supplies!

Now since I don't want to go and bust the bank I'm trying to start making more of my own scrapbook embellishments, since those seem to go the fastest. I had a box of plain brass brads from the office supply store, so I decided to start with them.

Numbers 1 and 2 are brads painted with acrylic paint and then given a top coat of clear nail polish. Think of all the possibilities here, how many of us have a ton of acrylic paint?!? Also, what if you added a layer of crackle medium between coats?

Number 3 is covered in sand. Now I just used sand from the sandbox out back, but what if you had special sand from a trip that you saved? What a great way to actually use it!

Number 4 is just covered in sparkly glitter. I gave it a quick coat with matte acrylic sealant to keep the glitter from falling off.

Number 5 is glitter glue. Simple as that.

Number 6 is a big pile of sequins.

Number 7 and 8 are sequin "flowers".

Number 9 is just a large sequin with a few small hearts glued on it. I only had a few of these floating around, great way to use up bits of this and that.

Numbers 10-13 are covered in....get ready for it......nail polish! Know how we've been paying for fancy "enameled" brads? That's what I made here, for nothing! I gave each a coat of clear nail polish to make them extra shiny. I am really excited about these, they look awesome.

Try making your own, I guarantee that you'll have fun customizing them for your needs. Plus, it's yet another way to truly make your LO your own.

Click "Linky Parties I Love" under "For Your Information" on the right to see where I'll be sharing my secrets.

Tuesday, May 4, 2010

Tuesday Morning's "Haul"

I was reading an article the other day and it seems there is yet another new trend swirling around. People, excited with the bargains they've been purchasing with the ever more stretchy dollar are posting their finds online.

"Haul" videos are becoming big on You Tube, where people make videos of what they've found while shopping and share their bounty with others via the Internet. Great idea, but I don't want to be bothered with figuring out the whole deal with posting video online.

So, instead I'll post my "Hauls" here in photo format on my blog to share my deals with others. I'll tag them "Heavenly Hauls" in the future to keep them all in one easy place for viewing. Ready for my first show and tell haul?

Yesterday I went to Tuesday Morning. I've not been there in a long time. I like that store, but I honestly forget that it's there. It's location isn't in the best place, not near any other places that I frequent. However after watching a few haul videos on You Tube, many of the ladies mentioned things they'd found there so I decided to go and have a looksie.

I bought lots of fun things. I'll let you know my grand total at the end. I bought these cute Christmas-y recipe cards, 40 of them for $0.69! I give homemade food gifts quite often, so I thought that these would be cute to include with the recipe. I also got these cute scrapbook embellishments, 4 different packages. They are different than anything I have, I'm excited to figure out how to use them in a layout. Also three full sized bottles of Aleene's School/Craft glue, good stuff!!
Then I bought these cute flocked chipboard embellishments for the boys scrapbooks. Dinosaurs and rockets, perfect! Found these cute fleece flower embellishments as well, they were dirt cheap! I like them because you can stack them up to create different flowers. One of my big "scores" was this MS Living scalloped rotary cutter. I've been toying with buying one of these for awhile now, but glad I didn't because it only cost $0.99!!!

I found these beautiful invitations, set of 10 for $0.79!! They are embossed in silver script, so pretty and simple. I don't know what I'm going to use them for but for that price I couldn't pass them up. Then I got a set of 10 game cards with the shell motif on them for $0.69. I am going to use them for gift tags, will just cut a piece of cardstock to fit the inside to cover up the inside.

I got the purple post it pad for $0.29, it says "Dear Sir or Madam" on top, so cute! I'm going to give them to my Mom for work. I found the cute floral magnetic notepad with matching pencil for $0.79, it even has an monogrammed "H" on top! The black easel came home with me too, it's a good size at the price was right at $1.99.


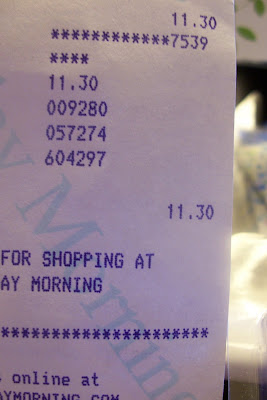
See my grand total?!? $11.30, wooohoooo!! So excited. I think I brought home some great deals. I am going to remember that store more often now, especially if I can come home with bargains like this again.
Will be linking up to my fave save parties. Check the "Linky Parties I Love" under the FYI column on the right to see where I will be sharing my secrets!