Showing posts with label Fab Frugal Finds. Show all posts

Tuesday, November 16, 2010

Thrifty Treasures

I was able to visit my favorite thrift store this past weekend while visiting my parents. I have found some wonderful things there in the years I've been shopping. You have to be patient with this store though, sometimes you'll walk out with lots and other times very little. This past weekend was a good run for me. Let me show you what I found!


First off, I paid a grand total of $14 and some odd cents for all of it. I bought 8 cafeteria trays (vintage), a pewter candlestick, a bookend, two sunhats, a boutique child's top and four woven decorative balls in all. Not bad I say!


These two sunhats were just too cute. The denim one is from Gymboree, it'll be a perfect little something for a friend of mine that's expecting her first baby. I love the details, especially the trim. The other floral hat is a bucket style hat for my daughter, Gap brand.


These decorative balls are huge, the pictures don't do them justice. Three are identical, I'd say they are 12" or so in diameter. The fourth one is even larger, I'd say 16" or so in diameter. The kids have already asked me if they can play soccer with them...so needless to say these will be up out of reach. I'm debating on wether to paint them or leave them as is, what do you think?


This bookend I'm definitely painting, I'm thinking my favorite ORB will look nice. I'm super excited on this find as I've been keeping my eyes open for a bookend or two for awhile now.

This candlestick is just too neat. I love the details along the base and the fluting on top. This thing is HeAvY too, and can you believe I only paid $2 for it?!? I don't own anything pewter and am excited that this is my first item I've found. BTW, does anyone have any good quick tips on how to tell if something is pewter? I always have trouble with that.

Thanks for listing to me brag describe all of my finds. Just wanted to show you that you can find nice things at thrift stores if you are patient and persistent. Happy hunting!

Friday, August 13, 2010

Freebie Fun on Friday


I ran across several "freebies" today while online and wanted to share them with you all. Please note that I'm sure this is just a marketing ploy by many to get your information, but at least you'll be getting something in return!

Free "business" cards from Starbucks. These are kinda silly, but they would be a great "gag" gift, perfect stocking stuffers:
http://www.starbuckscoffeeonthego.com/?page=energy

Free upgrade to "prime status" membership at Amazon.com for college students (requires valid college e-mail address). Gets you FREE 2 day shipping on your orders! http://www.walletpop.com/blog/2010/07/13/free-amazon-prime-membership-for-college-students/

Free customizable office supplies and gifts from Vistaprint.com. Please note that "shipping and processing" fees apply. Choose from coffee mugs, business cards, invitations, address stamp, calenders, magnets and more!
http://www.vistaprint.com/back2schoolmysavings.aspx?langid=1&affid=CD1954&GP=8%2f13%2f2010+3%3a02%3a56+PM&rd=2

Jamie from C.R.A.F.T has really cute free printable "inspirational quotes" that would be perfect for cards, framing or gift giving: http://craftingreallyawesomefreethings.blogspot.com/2010/08/free-art-work.html

Tuesday, June 15, 2010

Paint Your Own Planters

So I'm always on the lookout for inexpensive large pots. As I'm sure you know those aren't easy to find. Even the plastic ones tend to run around $10 for a good sized one measuring 12-14" in diameter. At a local nursery last summer I stumbled across what is now my favorite frugal planter. I found recycled cardboard planters for less than $4 a piece! They are big too, they run around 14" in diameter!

They "technically" are disposable, but I've had them for two years now. Left outside year round and have had no issues and they are as sound as they were when I brought them home.

The only thing is they are a lovely shade of putty, and I wanted something different for the garden. So I got out my trusty spray paint and went to work. The planter above is painted a shade of sage green. It's hard to tell in the photo, but it looks great in person.


Here are the planters in their unpainted state. They are awesomely textured and look so nice once painted. Think of all the options you have, you can make these fit any garden or "look" you are going for. The texturing makes the paint really pop too. They do use a fair amount of paint since they are cardboard, but using cheapie spray paint makes sense here. Plus I think the paint helps the planters become more impervious to the elements.

Keep your eyes open at your local nurseries for these, as I've yet to find them in any big box store. Snatch them up if you find them, I dare you to buy something similar new for less!

Linking up to my favorite linky parties, click on "Linky Parties I Love" on the right for the directory.

Saturday, May 29, 2010

Card Art

I am a big fan of picture frames. I have a lot of them. I always enjoy keeping my eyes open for a new one when out and about. Pictures, in my humble opinion are one of the cheapest and most meaningful decorations one can have in their home. That being said, every once in awhile I like to mix it up and frame things other than pictures. The white frame above was found at my fave thrift store for $1. It is a heavy thing, it must be made from cast iron. I love the swirly, intricate pattern that it has cast into it. Very shabby and "nesty" (I know that isn't a word). I found these really cute blue note cards with a nest on them and thought they would look cute framed. The silver "grid" frame was on clearance at Target for $2. It's a pretty good size, I think it's a 5x7. I got a really cute birthday card this year from my Momma, part of which had the cute vase with flowers that you see above. I cut it out of the card and framed it, I think it looks great for spring/summer decorating. It looks right at home with my first project I made in HS ceramics and the framed picture my oldest colored awhile back, I wrote more about framing/displaying kids art here .

Start looking at cards for frugal frame worthy options. It's a fun way to add to your collection without breaking the bank. Click "Linky Parties I Love" on the right to see what parties I'll be linking up with.

Wednesday, May 26, 2010

Think Outside the Drawer

So I have a super tiny kitchen, as in really small. I have a very small countertop area that holds the sink, a dishrack, the coffee maker and my kitchen-aid. That is all I can fit on that countertop. That is the only one in the entire kitchen. I have a buffet turned work island in the center of the kitchen, but the only thing I have on it is a cutting board.

Our cabinets in the kitchen hang really low, so mounting appliances under them isn't an option. Besides the fact that we rent, and we can't make any changes anyway but work with what's already existing. The microwave and toaster used to be on another small buffet but it was white and had a TON of crevices and was a major pain to clean. Momma was at her breaking point and something new needed to replace it. My only requirement was that I didn't want it to be white and it had to have a somewhat easy to clean surface.
Meet the newest member of our family, the sideboard. I think I'll name her Sally. Sally sideboard is really a dresser that I bought off of Craigslist this last weekend for $80. I wish she would have been a little less, but she fits in our kitchen perfectly and she holds a lot of stuff.

She has ten lovely drawers, all but two are filled up with stuff. Right now I have my cuisinart, waffle maker, george forman grill, cookie cutters, cake decorating stuff, recipe book, blender, a few bread baskets and washcloths for cleaning up the kids tucked safely away inside her lovely drawers. Like I said, she holds a lot of stuff!

I had fun making the top functional and pretty. I had to have the microwave and toaster oven on top. But I also wanted to add some functional fanciness to it as well. The canister you see here is filled with paper napkins. It's sitting on top of a red antique devilled egg tray and the tongs for the toaster oven are within easy reach. Your going to give me a pass on my dirty toaster oven, right? That thing is a major pain to keep clean. Seriously, I love how it works but cleaning it is an almost futile endeavor.
The end of the sideboard was looking bare, as I didn't have any other appliances that HAD to go there. So I decided to borrow a lamp from the living room to give the kitchen some more light. I also wanted to add a decorative element, so I added the potted flower and the pictures. I just bought this Kalancoe plant from 99 cent everything the day before and it looks awesome here. I found some moss growing in the backyard so I dug it up and brought it in, makes the flowers look professionally potted, huh? The pot saucer is an old transferware bread plate that I got for 99 cents awhile back.

Both of the white picture frames came from 99 cents everything as well. If you have that store in your area and you've not gone, you are committing a frugal felony! That is hands down the best dollar store I've been too. Anyways, I wanted to frame something that would be meaningful for me. I spend a TON of time in the kitchen (as most Mommies do) and I need the encouragement. So I framed my favorite picture of me and my Momma, every time I look at that picture I smile.

I also made a frame with a word that I've really been trying to put into perspective as a Mom lately, "Legacy". Anything and everything has the potential of being the building blocks of the legacy I will leave for my kids. They are at an age now that makes me very aware of how my actions will leave a lasting impression. I have a lot of work to do in that area, I need the reminder daily, sometimes hourly, that what I'm doing day in and day out is really contributing to the overall larger picture.

Please click on "Linky Parties I Love" on the right for the blogs that I like to party with and will be linking up to.

Sunday, May 23, 2010

Nifty Numbered Wall Rack

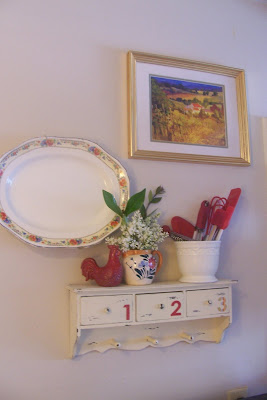
So I am totally enamoured with all the numbers I've been seeing in blogland lately. It's a really fun trend. I wanted to do something fun with this really cute wall rack that I snagged for a mere $4 from my favorite thrift store but didn't want really make it permanent. So I got the inspiration to use chipboard numbers from my scrapbooking stash instead, and they just so happened to be adhesive as well (big plus!).I love how it turned out. The colors really pop against the cream distressed finish (and it came that way too, I didn't have to do a thing but give it a bath). So fun, and it's a bit unexpected in my house.
The drawers are housing tea bags (in ziplocs of course) since I tend to drink lots of iced tea in the summer I thought that was a useful way to store it. This vignette is directly over my range, so it'll be very handy.

Everything I used to make this I already owned, with the exception of the wall rack. The large print on top was a score from a church rummage sale, I paid $1 (I luv it, my favorite print in my home). The platter was my paternal grandmother's, it's the only item of hers that I have. The red rooster was a homely thing that I transformed from the Dollar Tree (you can read about that here).

The white crock was an $1 repurposed plant pot (again from my fave thrift shop). I filled it with red kitchen gadgets that I already had. The floral pitcher was from my Dad's foster Mom, it's the only item of hers I have as well.

I'm not completely done yet. I'm looking for a picture of me and my maternal grandmother to frame and hang off one of the pegs. My fondest memories of her revolve around cooking and the kitchen. I though it would be a nice touch to have a picture of her to look at while I'm slaving away at the stove;) In all seriousness, it would be really special to me. Once I get that completed, I'll take an updated photo of the finished product.

This was really fun for me, I love how it brightened up an otherwise kinda boring view of the main wall in the kitchen. I'll be linking up to all my favorite linky parties, you can find their info under "Linky Parties I Love" on the right.

Wednesday, April 28, 2010

Free eBooks

So I was looking for a book online the other day and learned about an awesome new (ok, new to me) concept, online eBooks! What a great idea, doesn't clutter up the house and no trips to the library necessary.

I also saw that there are options for FREE eBooks as well! I went to Barnes and Noble and saw that they have lots of free titles available. I even found a specific book I was looking for as a free eBook! Here's the link for Barnes and Noble's eBook reader and more info on it:http://www.barnesandnoble.com/ebooks/how-it-works.asp?cds2Pid=29168&linkid=1564100


What a wonderful resource! It's amazing that there are still some free things out there, just have to find them. Click "Linky Parties I Love" on the right to see what parties I'll be linking this awesome info up to.

Wednesday, March 17, 2010

Coupe Soup Candleholder

I found this really cute iridescent glass shade at Goodwill for 99 cents. It reminds me of the glass shades that you use with ceiling fans that have light fixtures. It's a pretty tan color with that awesome iridescent finish. I had found this cute "vintage" coupe soup bowl at an antique mall awhile back and paid a whopping 99 cents for it too. I love the pattern, I'm a sucker for pretty much all things transferware.

I was going to glue the bowl down to the glass shade, but decided not too so that I could use the pieces for other uses if I wanted to. Besides I wasn't too worried about it being unstable, since the bowl is larger than the shade it's pretty solid. I used two different ribbons to tie around the top of the glass shade. The top wasn't very pretty, so I wanted to hide it.

All in all I think it turned out pretty cute. Like the uniqueness of it and I'm glad that I didn't glue them together so that I can use them for different things at a later date.

Linking up to the following,

Funky Junk's Saturday Nite Special


Keeping It Simple

DIY Day @ ASPTL

Creations by Kara

Decor Mamma

Wednesday, March 10, 2010

Vintage-y Family Sign Display

I've wanted to make a family sign for awhile now. I was going to get a wooden sign and paint it, but then I found this awesome tray at the Dollar Tree and was inspired to use it to make my sign. At first I had another use for it in mind, but after looking at it I decided that it would be perfect. Pretty much everything in this "vignette" is all new/revamped. Let me tell you what I did, 'kay?

The tray came home solid silver. I painted it with one thin coat of brown acrylic paint, followed by three coats of Kilz semi gloss in "Antique White". I then took sandpaper and sanded it down, to expose the silver and brown undercoat, giving it a "worn" look.

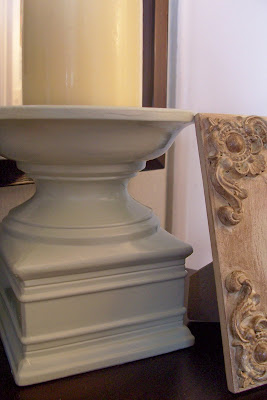
The pillar candleholder was a garish, tarnished gold when it came home from the thrift store. Three coats of the same Kilz paint had it looking good. This is ceramic, and the paint adhered wonderfully. You can see the corner of a picture frame in the shot. Super cute frame, from the Dollar Tree. Cute scroll work embellishments in the corner, ugly brown to begin with. I painted it with one coat of Kilz, followed by a light coat of metallic brown glaze. Then I took sandpaper to it, distressing it slightly.

I used my scrapbooking stamps to stamp out the lettering on the sign, it turned out perfectly. I just finished it off with a light coat of matte acrylic sealant to keep it protected. The finial looking thingy is also from the Dollar Tree. Came home this funky, mottled brown and I spray painted it solid semi-gloss brown and then used the same metallic glaze that I did with the picture frame.

I left the reverse side of the finial solid brown for versatility. I am over the moon happy with how this all turned out. It cost under $10 for what was bought new (tray, picture frame, finial, pillar holder and glaze). It only took a few days start to finish (including drying time for everything). I'm so happy with the overall look, including the chippy cabinet top that it's all displayed on. The only thing I want to do is update the pictures in the frame that's hanging on the wall.

Linking up to the following,

giveaways

Funky Junk's Saturday Nite Special


Making

DIY Day @ ASPTL


Sunday, March 7, 2010

Ruffles n' Scraps Scrapbook

So I found this cute scrapbook in the clearance section for...are you ready, $3.97!! For a 12x12 album, I was thrilled. Figured out pretty quickly why it was in the clearance section. There were these weird little brown dots on the front. So I figured I could cover it up somehow and brought it home.

I took scraps of fabric and made a ruffled layered border. The red polka dot fabric is actually the hemline of an old dress of my daughters that I had cut up for another project. The photo frame is a Valentine's card that I got on clearance at Target, it has "Love" printed on the side so that is why there are buttons there.

I just hot glued it all to the scrapbook and wrapped it to the inside, and finished it off with a grosgrain ribbon to cover all the ends.

I really like how it all layered. The elastic is actually part of the scrapbook, it holds it closed which is pretty cool.

All in all, pretty happy with the results. Just under $4 for the book, everything else I had on hand. I already have a baby book for my daughter, but this will be perfect once I get her book completed. Shhh....don't tell anyone that my daughter is almost five and I don't have her baby book done yet, ok?

Linking up to the following:


Keeping It Simple

BWS tips button

Friday, March 5, 2010

Meaningful Numbered Box

I found the cute lidded box above at Goodwill about a week ago. Only paid $2, what a find! I've really been trying to incorporate more lidded storage in the house. I've heard time and time again that hiding the clutter (and boy do I have a lot of clutter!) is key. So, I've been on the hunt for boxes and was so excited when I found it. When I got it home though, I thought it looked a little boring. Wanted to do something to it to make it pop a bit more, but didn't know what to do.

I've seen all sorts of numbered things lately in catalogs and blogs. Dressers, magnets, picture frames, mirrors. You name it, I bet they have made it with a number on it! So, I decided to follow the trend and use numbers on my box as well. But I wanted the numbers to be meaningful, not just random. The box had four sides, so I picked the date of each of my three kids birthday's and the day that Hubby and I were married. It'll also be helpful as I am horrible with remembering dates, if I don't remember then I can just look at the box.

I printed out each number on the computer on ivory colored paper. I hand stamped the "no" next to each number and mounted them on cardstock. Then affixed them to the box with good 'ol Mod Podge. One coat of matte went on as a sealant, and since I didn't spray the paper beforehand the ink from the stamping smudged a bit. I was going for the aged and worn look, so that was perfect. I then used brown paste shoe polish and went over each circle completely, "aging" it. Then I used two different shades of brown stamping ink and just randomly blotted over each circle. A quick wipe down with a tissue helped to blend it all and remove any excess ink.

I like the finished product quite a bit. I would do the numbers bigger if I could but other than that I'm really pleased. At first I was really irritated that the circles had bubbles in them, I didn't use Mod Podge to adhere the numbers to the cardstock but a glue stick instead so it didn't seal as well. But all finished, I think it adds to the "vintage" look overall. Not bad for $2, don't you think?


Linking up to the following:

Funky Junk's Saturday Nite Special

Making


DIY Day @ ASPTL