Wednesday, May 18, 2011
Barn Charm Birdhouse
Saturday, May 7, 2011
From Like to Love
This is what I did originally. I used crackle medium on the oak frame and "whitewashed" it. Then I dry brushed some acrylic paint on the mat. Iused a pinkinsh brown on the outer portion and then dry brushed white on the inner portion. To finish it off, I cut up some linen and used it as a border between the two colors. I liked it, but it was still missing something.
Then I had the idea to use some galvanized french chicken wire. I took my wire snips and cut a square out, then cut out the center as to not cover the print. Didn't want that sweet girl to look like she was in a cage ;) However, I messed up and cut a portion too short as you can see along the bottom. I debated wether to start over again, but decided not too. Since the whole thing now has an aged, worn look I decided the messed up chicken wire helped with the overall look. That is what I'm telling myself anyway!
So next time you have something around the house that you like, but it just looks out of place try updating instead of replacing. It's a great way to upcycle and it lets you be creative at the same time.
Please click on "Linky Parties I Love" to see where I'll be sharing my latest project. Thanks!
Thursday, January 20, 2011
Step Stool Facelift
It looked great, but I was worried that banging around in the bathroom would scratch it up, so I used two coats of Minwax Polyacrylic to seal it. Yep...it worked on plastic!
Please click on "Linky Parties I Love" to see where I'll be sharing my latest project!
Friday, September 10, 2010
Cabinet Door Plaque
Anyhoo, I used the green one above to make this plaque. I am thrilled with how it turned out, and it honestly took me about 30 minutes start to finish. Curious to know how I did it? Let me share with you my secrets!
First off, all the lettering and trim is from my scrapbooking stash. They are all rub-ons! Yep, how easy is that?!? I love these things, they are wonderful for all sorts of other applications besides scrapbooking.
Right now my favorite bible verse that I've memorized and have repeated
Tuesday, June 15, 2010
Paint Your Own Planters
They "technically" are disposable, but I've had them for two years now. Left outside year round and have had no issues and they are as sound as they were when I brought them home.
The only thing is they are a lovely shade of putty, and I wanted something different for the garden. So I got out my trusty spray paint and went to work. The planter above is painted a shade of sage green. It's hard to tell in the photo, but it looks great in person.
Keep your eyes open at your local nurseries for these, as I've yet to find them in any big box store. Snatch them up if you find them, I dare you to buy something similar new for less!
Linking up to my favorite linky parties, click on "Linky Parties I Love" on the right for the directory.
Thursday, May 27, 2010
Stenciled Candleholder

Originally I was going to paint the wood black and then replace the backing with some cute scrapbook paper. But when I popped the backing out I discovered the glass was actually painted black as in coated and it would have been super hard to remove it.
So plan b involved a stencil. I had a plastic flower stencil that I just taped down to the glass and painted on the flowers with leftover acrylic paint and a piece of sponge. The stencil was too large to completely cover the glass, so I just did three partial images and staggered them.
As you can see, the stenciling isn't perfect. Parts are somewhat blurry, it's not super crisp and defined but I like it that way. I used a gloss black spray paint, didn't prep the wood at all except to wash it well and let it dry before painting. Several coats of paint later and this is the finished product. I love it!
Click on "Linky Parties I love" on the right to see what parties I'll be linking up with.
Sunday, May 23, 2010
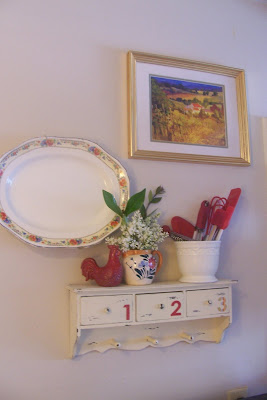
Nifty Numbered Wall Rack


The white crock was an $1 repurposed plant pot (again from my fave thrift shop). I filled it with red kitchen gadgets that I already had. The floral pitcher was from my Dad's foster Mom, it's the only item of hers I have as well.
This was really fun for me, I love how it brightened up an otherwise kinda boring view of the main wall in the kitchen. I'll be linking up to all my favorite linky parties, you can find their info under "Linky Parties I Love" on the right.
Friday, May 21, 2010
Monogramed Picture Collage


I didn't even bother trying to hang them uniformly, because since they are easily accessible to little hands I knew they'd never stay that way. I kinda like the free form look anyways, a little unexpected.
Cute and cHeaP wall art, and I already had everything on hand which is always a plus in my book. Look under "Linky Parties I Love" on the right to see what lovely blogs I'll be sharing my creation with.
Thursday, May 13, 2010
Beaded Fab Flip Flops

I took glass beads and wire (26 gauge I believe, straight out of the hardware department) and wrapped the plastic upper part of the flip flop. I tried to use the clear plastic cording that most people use when making beaded jewelry, but it was too hard to keep in place while wrapping the strap.


I've even worn them a few times, they felt great. Now don't go jumping into the pool with these beauties on, but they will look great all summer long and you'll get lots of compliments on your cute shoes (I sure have). Fun craft to do with the kiddos too!
Click "Linky Parties I Love" on the right under "For Your Information" to see what fun parties I'll be linking up these fun flops to!
Friday, April 9, 2010
1 Pot 4 Ways
I'm on a scrapbook paper kick lately, trying hard to come up with ways to use some of my huge stash up without actually scrapbooking (yeah..makes perfect sense, right?). So I had a bunch of scraps to use up, and started to play around with them on these pots and decided to go for it.
I present to you....one pot, four ways. I started by giving all of the pots a quick coat around their rims with paint. I didn't want to have to mess with trying to cover those with paper. I used Kilz in "Antique White", one quick coat and I didn't bother sanding, priming, or even giving it a complete coat. I was going with the "shabby" look.
Then each pot got a liberal coat of Mod Podge (I used gloss) followed by the scrapbook paper. I thought that strips would be the way to go as opposed to trying to cover the pot with a solid piece of paper. Definitely made it easier.
After giving each pot a coat of the same Mod Podge to seal it, I went to work on the embellishments. Jute rope, ribbon and silk flowers are what I ended up using. I waited until the pots were completely dry before decorating them. I used a hot glue gun to affix everything.
I really like how they all turned out the same, but different. I like how I rotated between two different papers on each pot, makes it a bit more fancy. However it would be cute to use all the same paper on one, I'm going to try that next time.
This project couldn't have been less expensive, especially if you have the tools on hand. Besides the $1 for the pots (well...$1.09 with tax) I didn't spend another dime and used things I already had. You could even get ultra creative and try to use pots you already have. Think black gallon nursery pots or metal cans (like coffee or from canned goods). Just make sure to add drainage holes if needed.
I put another smaller pot inside of the finished product. If the Mod Podge got really wet well then all bets are off. I still don't know if I'd trust it with a heavy coat of acryclic sealant. I also wouldn't use these outside either, but for indoor plants. They would be cute on a end table or in your kitchen window, if your so lucky to have one. Just don't forget the coasters!
Linking up to the following,
http://itssoverycheri.com/
Wednesday, March 24, 2010
Bevy of Beautiful Birdies
So in going with the trend, my house has lots of little birds living in it right now. Until a few months ago, the only birds in my house were the roosters in my kitchen. Not any more. Now there's a yellow duckie in my bathroom, a new rooster friend in my kitchen and two little birdies have made a home in my living room.
They all were kinda blah and boring when they came here, so I "bathed" them in some paint and how cute and cheery they became! Much better. Let me share my bird bathing techniques with you so your little birdies can sparkle too!
This little guy came to us from the Dollar Tree. He was cute to begin with, blue and yellow feathers and these super cool metal wire legs/feet. However I thought he could be even more special. So I bathed him with a coat of Kilz semi-gloss in "Antique White" and glazed him with a 3/1 paint to water solution. I used acrylic nutmeg brown paint to make the glaze. I think that all cleaned up he looks great, his new top matches his cute little bottom much better.
The rooster also came home to us from the Dollar Tree. He was this yicky pale yellow with a dingy brown coat of dust all over him. Not very pretty, but don't tell him because I don't want to hurt his feelings!
I "bathed" his feathers in some Color Place spray paint in "Fire Red" and then glazed him with a bit of acrylic metallic brown glaze. Much better. He looks right at home with the other rooster fellows that are already calling my kitchen home.
This little gal also came home with us, she too was lonely and neglected at the Dollar Tree. She was a homely little thing, she looked so pale and sad when she got home. I first learned of her plight by seeing what another lady had done with her little birdie that she brought home here.
To "bathe" her I mixed up some white and grey acrylic paint and painted her a really light grey. Then I mixed some white and metallic green acrylic paint and gave her a "mottled" overcoat. I wanted her beautiful feathers on her wings to really shine, and I think they do now. She was so special that she needed a very special "nest", so I found a special transferware saucer and she now calls it home. In fact, she loves it so much she never leaves!
Linking up the the following,


Sunday, March 7, 2010
Ruffles n' Scraps Scrapbook

So I found this cute scrapbook in the clearance section for...are you ready, $3.97!! For a 12x12 album, I was thrilled. Figured out pretty quickly why it was in the clearance section. There were these weird little brown dots on the front. So I figured I could cover it up somehow and brought it home.
I took scraps of fabric and made a ruffled layered border. The red polka dot fabric is actually the hemline of an old dress of my daughters that I had cut up for another project. The photo frame is a Valentine's card that I got on clearance at Target, it has "Love" printed on the side so that is why there are buttons there.
I just hot glued it all to the scrapbook and wrapped it to the inside, and finished it off with a grosgrain ribbon to cover all the ends.
I really like how it all layered. The elastic is actually part of the scrapbook, it holds it closed which is pretty cool.
All in all, pretty happy with the results. Just under $4 for the book, everything else I had on hand. I already have a baby book for my daughter, but this will be perfect once I get her book completed. Shhh....don't tell anyone that my daughter is almost five and I don't have her baby book done yet, ok?
Linking up to the following:


Friday, March 5, 2010
Meaningful Numbered Box

I found the cute lidded box above at Goodwill about a week ago. Only paid $2, what a find! I've really been trying to incorporate more lidded storage in the house. I've heard time and time again that hiding the clutter (and boy do I have a lot of clutter!) is key. So, I've been on the hunt for boxes and was so excited when I found it. When I got it home though, I thought it looked a little boring. Wanted to do something to it to make it pop a bit more, but didn't know what to do.
I've seen all sorts of numbered things lately in catalogs and blogs. Dressers, magnets, picture frames, mirrors. You name it, I bet they have made it with a number on it! So, I decided to follow the trend and use numbers on my box as well. But I wanted the numbers to be meaningful, not just random. The box had four sides, so I picked the date of each of my three kids birthday's and the day that Hubby and I were married. It'll also be helpful as I am horrible with remembering dates, if I don't remember then I can just look at the box.

I printed out each number on the computer on ivory colored paper. I hand stamped the "no" next to each number and mounted them on cardstock. Then affixed them to the box with good 'ol Mod Podge. One coat of matte went on as a sealant, and since I didn't spray the paper beforehand the ink from the stamping smudged a bit. I was going for the aged and worn look, so that was perfect. I then used brown paste shoe polish and went over each circle completely, "aging" it. Then I used two different shades of brown stamping ink and just randomly blotted over each circle. A quick wipe down with a tissue helped to blend it all and remove any excess ink.
I like the finished product quite a bit. I would do the numbers bigger if I could but other than that I'm really pleased. At first I was really irritated that the circles had bubbles in them, I didn't use Mod Podge to adhere the numbers to the cardstock but a glue stick instead so it didn't seal as well. But all finished, I think it adds to the "vintage" look overall. Not bad for $2, don't you think?
Linking up to the following: