Showing posts with label Gracious Gifting. Show all posts

Friday, April 22, 2011

Fun With Fabric

A friend of mine recently had her first baby. The theme of her daughter's nursery is Dick and Jane. I love me some Dick and Jane, the girl has good taste. So I decided to make her a gift that she could use for nursery decor and had a function too. Enter this memo/photo board and barette holder.

I took an 11x14 frame that I bought on clearance at Jo-Jo's (Joann's), and used it for the photo board. Lots of cork, fabric, ribbon and hot glue threw togther made the above result.


For a cute little tie in for her daughter, I used pink buttons.


I also used some flat glass marbles to make a few matching push pins.


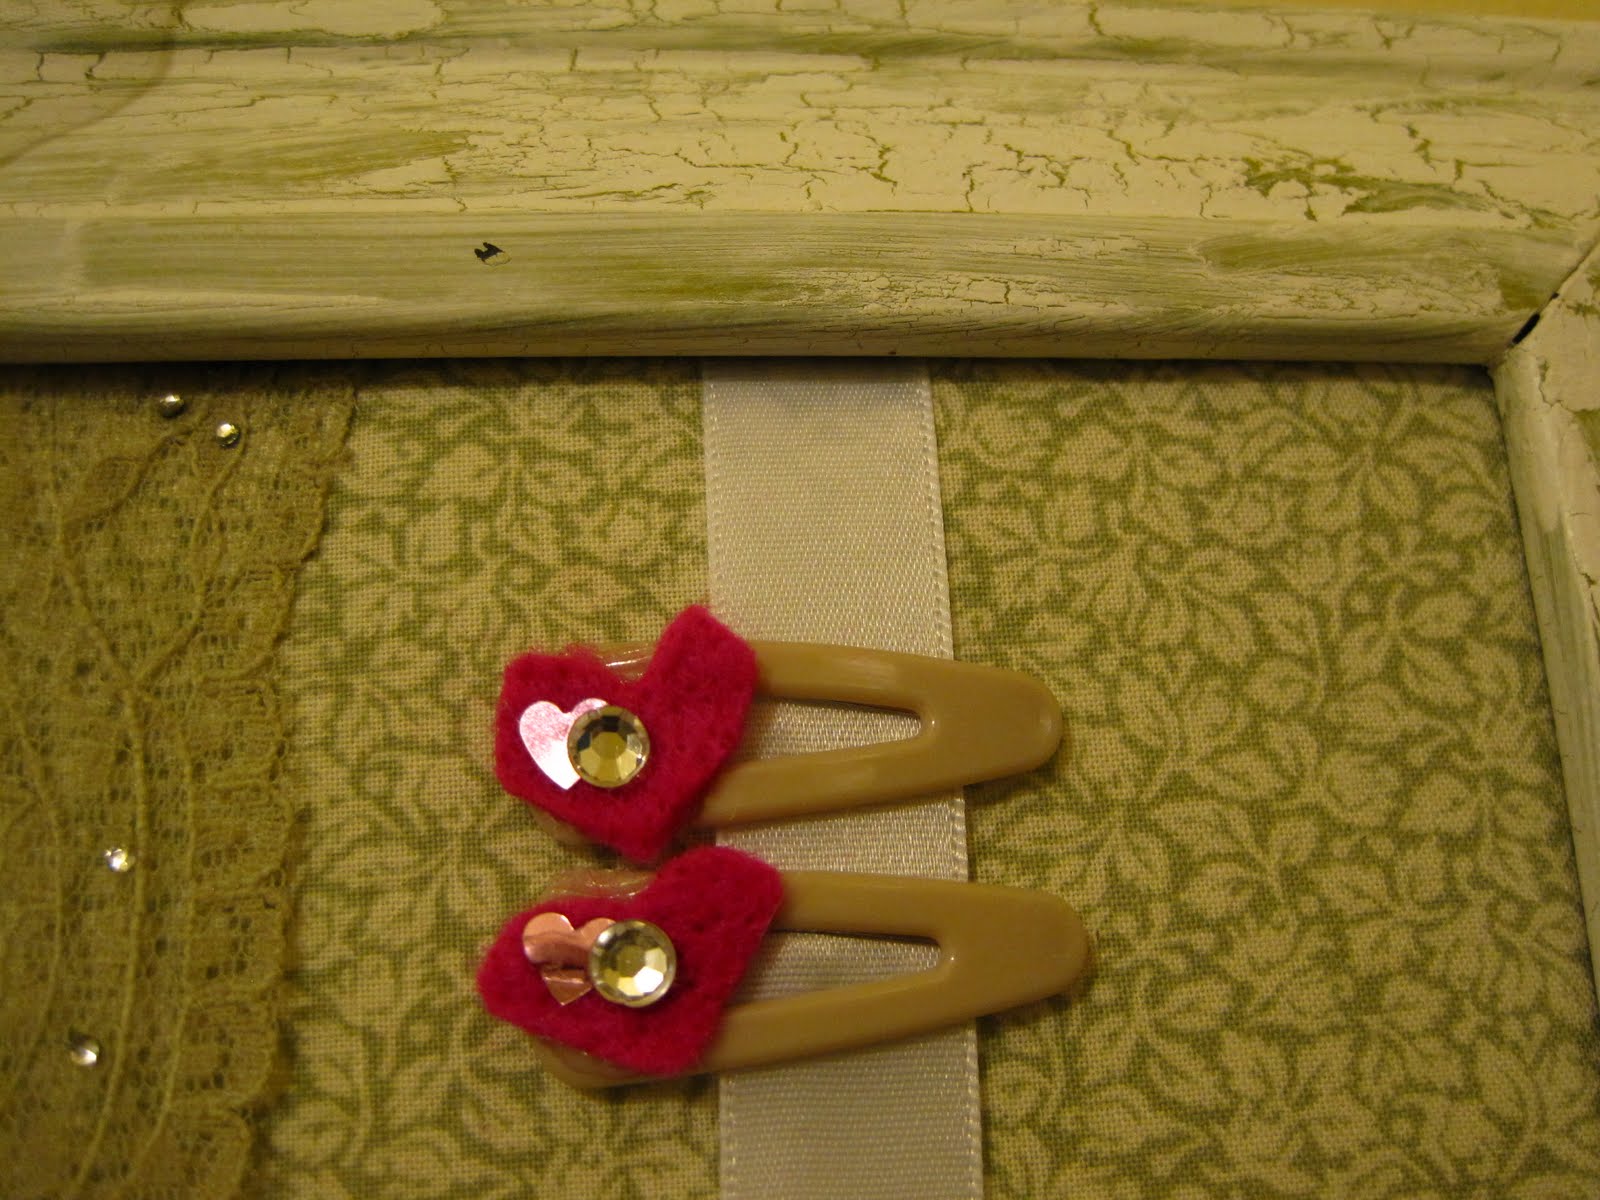
The barette holder above is the same fabric stretched over an old canvas, then adorned with ribbon and buttons.


Easy to clip barettes directly to the ribbons for fun and functional storage. No digging around in a box, drawer, bowl, etc.


I love the vintage feel to both projects. I am a sucker for all things vintage right now. I really am.


So, are you dying to know how to make your own? Click on the vintage "You Tube" TV on the right sidebar and you'll be directed to my You Tube channel. I have video tutorials for each project. There are a few (okay...maybe more than a few) installments for each project, so make sure you watch them all. Then get to crafting something!


Please click on "Linky Parties I Love" to see where I'll be linking up my latest creations.

Monday, February 14, 2011

Coffee Can to Cute Container

A friend is having her first little one in a few weeks, and so this weekend I worked a gift for her. The nursery theme is Dick and Jane, (SO cute!) but I didn't have any Dick and Jane books lying around the house. However I did have a Richard Scary one, (who can find Goldbug?) so I decided to use it to make the above cute little container. I put flowers in it as you can see, but I'm sure that it can have all sorts of other uses.

I took the can, cleaned it out and got to work. First off I mod podged some book paper to the can. After it had dried I used some green electrical tape around the top and bottom to help cover up imperfections. Then I layered on some red grosgrain ribbon, followed by some white satin ribbon and then topped it off with some blue ric-rac. It looks really cute, no? And it works well with the primary colors in the nursery.

This is the finished gift, all packed up and ready to go. I took a lidded storage box from Ikea and padded it with tissue. In went the flower can, along with a few parenting devotionals, a few Dick and Jane board books, a bib, a cute bucket hat w/floral pin, a vintage children's book and an adorable crocheted baby sweater. She loved her gift, and I had fun putting it together for her.

Please click on "Linky Parties I Love" to see where I'll be sharing this gift idea.

Wednesday, January 12, 2011

Fab Fabric n' Felt Valentine Wreath

So yesterday I worked on my latest Valentine's Day inspired decor idea while the kiddos were napping. I made this wreath for the front door, but I can't decide if I like it or if I should add something to it.

I wanted to use nothing new, but make it all from what I had on hand. I didn't have a wreath form, so I cut out a cardboard form and worked from there. I decided to change it up a bit and went with a rectangular shape. I actually like how it plays off the paneling in the front door.

I wrapped it in red felt, and then used some red fabric to accent the corners and make the little rosettes in the corner. I used bakers twine to wrap the entire perimeter when I was done and used a piece of red velvet ribbon as my hanger.

What do you think, should I do something else with it or leave it as is? I can't decide. On one hand I like the simplicity of it, on another hand it looks like a monotone rectangle to me. What would you do? Be honest, nice...but honest ;)

Here are some Valentine's Day related ideas from last year, a CD card...

some vintage Valentine printables....

and some hand dipped chocolate covered caramels. All really easy, all really inexpensive. If you look in the blog archives from Jan/Feb 2010 you'll find all of these ideas.

So, give me some feedback on my wreath. I'm interested to see what you all have to say!

Saturday, January 8, 2011

Picture Perfect Barrette Holder

I made this for a little friend's birthday. She has many barrettes, but no place for them to call home. So after seeing all the cute barrette holders here and there in Blogland, I decided to make one. Here is the end result, not to shabby, right? Here's what I did.

I took a cheap black dollar store frame and gave it a basecoat of avocado green. I then used crackle medium followed by a coat of white paint. Then I gave it a light coating of matte sealant. I've never used the crackle medium before, that stuff is pretty cool. I can see lots of chippy stuff in my future.

I removed the glass completely, and then took the backer board and covered it with a layer of quilt batting. I then covered it with some green floral fabric and then chose three matching ribbons. After hot gluing everything in place I was pretty much done.

I decided to make a few quick barrettes to hang on the ribbons. I took some baby clippie barrettes from the dollar store and hot glued on some felt, followed by a few rhinestones. Easy, simple and pretty cute.

I took some sheer white ribbon and a bit of tulle and ran it through two eye screws I hot glued to the back of the frame as the hanger. That's it, very easy assembly actually. I am definitely making on of these for my daughter.

Please click on "Linky Parties I Love" to see where I'll be sharing this idea. Also linking up at this special "Celebrating Girls" month linky party here:
Keeping It Simple

And linking up for the first time at "fix it up friday" here:


What fun project do you have in the works?

Tuesday, December 21, 2010

Dino Playboard and...

So, awhile back I was blown away by this awesome dino playland that Kaleen from At Second Street made. You can see it here. When we bought youngest some dinos for Christmas I wanted to make something to go along with it and I thought of her idea. However a suitcase was too big (and I didn't have one to use), so I decided to use a board instead.

I used a wooden board and made a smaller, easier to store version and here it is. Yes, it's not nearly as fancy as the one that Kaleen made but it'll work and it was made completely with stuff I had on hand.

I covered the board in grout left over from a bathroom project, and once dried I painted it. I sprinkled sand and painted over it to add some texture. I took a few rocks from the kids stash and hot glued them to the end, sticking some spanish moss in between the stones.

To make the "mountain" area I glopped up some grout and made a mound of it. I then hot glued some sand to the top once painted. I used green to make grass, and some grey and brown to vary it a bit. Very simple, but it'll work and I think that he'll enjoy this area to use for dino play.

On another note, I know I said I was done making ornaments but I couldn't resist showing this one. He's Frosty, isn't he super cute? I took three foam balls, covered them with hot glue and then stuck on quilt batting. His hat is made from black stacked buttons and his nose and arms are a twig from the backyard. I tied on a scrap of fabric and used white ric-rac for his hanging loop. I think he's perfect.

I was also drooling over some mercury glass ornaments I saw on a website. I love how aged and imperfect they are, and an idea popped up. I grabbed a plain gold glass bulb and took some sandpaper to it. The finish started coming off and it took on a great aged look. It's hard to tell in the picture, but if you click on it to enlarge you'll get an idea. This would really work with a darker ornament (like red, green or blue). Not mercury glass, but it's an improvement.

Please click on "Linky Parties I Love" to see where I'll be sharing.

Four days until the birthday celebration...are you remembering to include the birthday boy in your thoughts and preparations?

Sunday, December 19, 2010

Frugal Framed Fabric Art

First off...the lighting on these pics is pretty crummy. We've had three straight days of rain, the house has zero natural light and I can't go outside. So, enjoy the lovely yellowish haze.

This is a gift that I made for my MIL. She is crazy for all things quilts, and has a wall of fabric art and quilt squares in her living room. I was going to make something else for her, but after losing part of it (ggrrrr) I had to come up with something else and this is it.

I took a vinyl removable wall decal and placed it in the middle of the frame, on the outside of the glass. I then took a piece of fabric and sandwiched it between the glass and went to town with the embellishments.

The flowers are circles of fabric that are rubber banded around a button. I needed a easy, no-sew option for me and this worked well. I used those mini plastic rubber bands that you find in the beauty section of the dollar store.

I then took some linen and vintage ribbon and edged the outside of the frame. The decal gives the glass a pretty, frosted look but since it didn't cover the entire front I wanted to cover the plain glass so that there wasn't a visible line. So I layered the ribbon and the linen and it worked well, I hot glued them directly to the glass.

I then took some trim and buttons and glued it on top of the linen, just to cute it up a bit.

All in all, pretty easy and very inexpensive. Everything I used was stuff I already had on hand, with the exception of the frame which my Momma gave me.

Please click on "Linky Parties I Love" to see where I'll be sharing. Happy Handmade Christmas!

Thursday, December 16, 2010

Fabric Scraps Wreath

Since my "Happy Handmade Christmas" workshop is in full swing, here are a few things I made for some gals on my list. All materials used are items I already had on hand, my goal this year is to use up as much of my stash as possible when crafting gifts.

This is a wreath I made from fabric scraps, some ribbon, some quilt batting and a foam wreath. I took the quilt batting and wrapped a single layer around the wreath form to bulk it up a bit. Then I cut fabric scraps, approx 1 inch wide by 5 inches long. I just wrapped them and tied them off.

I took some woven ribbon and tied off the top, pretty simple. I was going for the country/folk/rustic look, I think it'll pass. I'm hoping my Hubby's aunt likes it, 'cause I love it and it's hard to part with!

I made the jewelry holder above for my Hubby's cousin's wife. I just hot glued various types of ribbon/trim to the back of the frame and hot glued a few eyescrews to the top and ran some pink tulle though to make a hanger.

I've made a jewelry holder for myself before, you can see it here . I wanted this one to be different though, I like how it turned out. I think I'm going to tweak this idea a bit to make a barrette holder for a friend expecting a baby.

So a few more gifts to check of the list, yay!! Please click on "Linky Parties I Love" to see where I'll be sharing. Happy Handmade Christmas!

Wednesday, December 15, 2010

"Vintage" Train Signage

I needed to make a gift for my FIL and my Hubby's uncle. They both are really into trains. I had already framed a neat vintage train photo for each of them, but wanted to do something else. I got the idea to make a sign, this is the end result. I absolutely love how they turned out!

I started with a wooden slat, from IKEA to be exact. I had bought a slatted bed base that we didn't end up needing, so I cut it up and used one of the wooden slats as my base. Totally free wood, precut and sanded. Score!


I took black wrapping paper and Mod Podged it to the wood. After it dried, I took sand paper and distressed it really well.

I had a stencil for the letters. I took white and grey acrylic paint, mixed it and dry brushed it on. I wanted it to be spotty and faded looking and it turned out just the way I thought it would.

The railroad logos I found on the internet and printed them off on cardstock. I picked ones that would be meaningful to the recipients, there are so many to choose from that it's easy to do. I Mod Podged them to the sign, and then distressed them with a pencil eraser and went over them lightly with black ink from a stamp pad to "age" them.

The whole thing was then coated with some matte acrylic spray varnish and I was done. If I could do anything differently, I would have covered the sides with paper and distressed as well.

My hubby actually said, "Wow honey" when I showed him my finished product. That was a first for me, so I'm hoping that the recipients will like them too!

Please click on "Linky Parties I Love" to see where I'll be sharing. Happy Handmade Christmas!

Handmade Gifts for Guys

I don't know about you, but I personally find it easier to craft items for gals as opposed to guys. However, this year since it's all about "Handmade Christmas" at our house, I had to get creative with gifts for the guys, here are a few I came up with.

I took mini acrylic photo frames and glued a few car fuses onto the bottom. I think that the recipient who's really into cars will like them.

I dug around in the backyard and found some stuff to make school/office supplies. What guy doesn't like rocks?

I used some rock beads that I had, glued them to wooden discs and attached thumb tacks on the back.

The rocks I found in the backyard were hot glued to magnets and then I sprayed them with acrylic sealant (gloss). Done, packaged them in the hinged jar and we're good to go.

I then took a standard collage frame, the plastic kind you'd find at any dollar store and gave it a few coats of chalkboard paint. Now you've got a fun picture frame, this is for a college aged guy and I think he'll like it.

So here are a few options for the guys in your life. Please click on "Linky Parties I Love" to see where I'll be sharing this week. Happy Handmade Christmas!!

Snow in a Pot

I made these for gifts this year, I was going to do something else but it didn't work so I came up with this instead.

I took two small terracotta pots and painted them, green on the bottom and red around the top. I then glittered them, green glitter on the bottom and gold on the top.

I took fiber-fil and used that as my "snow", filing the pot. I then took some silver glitter and sprinkled it on top.


The "Let it Snow" signs are actually plant markers, I wrote in black sharpie and then hilighted with a white paint pen. I used vintage wooden mini-ornaments and glued one next to the sign. That's it...pretty simple and cheap!

Please click on "Linky Parties I Love" to see where I'll be sharing. Happy Handmade Christmas!!

Friday, December 10, 2010

Letters From My Heart


“Hear, O Israel: The Lord our God, the Lord is one. You shall love the Lord your God with all your heart and with all your soul and with all your might. And these words that I command you today shall be on your heart. You shall teach them diligently to your children, and shall talk of them when you sit in your house, and when you walk by the way, and when you lie down, and when you rise. You shall bind them as a sign on your hand, and they shall be as frontlets between your eyes. You shall write them on the doorposts of your house and on your gates." Deuteronomy 6:4-9

Last night I was thinking about things I needed to get done. Mostly Christmas related, gifts I needed to still make, plotting and planning type stuff.

I started thinking about gifts for the kids, making mental notes of what I needed to still do for them. I then had an idea I had never honestly thought of before, writing them each a letter.

It could be a letter about what the past year had been like. Or it could be about our relationship as mother and son/daughter. Or it could be advice that I want to give them now but they are too young to hear. Or it could simply be a letter to let them know they are loved.

A letter they can read when they are older, something put away for a time when they can understand what I'm trying to convey. Something tangible, that they can hold in their hands and see with their eyes.

So much of our days consist of the mundane, the regular, the rituals. It's hard to take the time needed to really look at the bigger picture of parenting when you are knee deep in the middle of laundry, spilled food, fighting and dishes.

My hope is that by taking the time to write these letters to my children, I will be allowed the opportunity to relay things to them in a way that will make a lasting impression. Not that my spoken words and actions aren't important, but honestly we as parents and they as children forget sometimes.

This will be a way to write about the blessings and the lessons that God has taught me as a mother. A way to tell them about how I see God working and growing them. A way to reflect on these things as I write them, and a way for them to see things through my eyes when they read them. A way to leave a part of myself now in the present that they can read in the future.

I would love those of you that are mothers to consider doing this. No matter what age they may be, whether they are unborn or 35 years old. Children are such a blessing to us, they are our legacy. What a way to honor their importance, to let them know of their worth to both us and their heavenly Father.

If you feel that you'd like to participate in "Letters From My Heart" this Christmastime, please post a comment indicating you'll be doing so. Or, if you already do this please post a comment to renew your commitment to continue.

To those of you'd who would like to spread the word to others, please feel free to mention this on your blogs as long as you link back to this original post. It would be wonderful to get as many mothers as possible to commit to doing this for their children. What an opportunity to give an amazing gift to our children that won't cost anything but time.


I'm spreading the word at:


Photobucket