Showing posts with label DIY Tuesday's. Show all posts

Friday, February 12, 2010

Skewer Sunburst Mirror

So, I love all the cool sunburst mirrors I've been seeing on various blogs. Really cute, love the fact that they can be DIY. So, decided to try it. I wanted mine to be a bit different though.

I wanted mine to have "beads" on it. I've seen them on actual honest to goodness vintage mirrors and really liked the look. Think it adds just a bit more to it. So, set out to figure out how to replicate it myself.

But let me go in order of how my pics loaded, okay? So this is what I did. I took an old CD (sorry Shawn Mullins, your days are over) and hot glued the skewers to it. When I was done, I took another CD and made a "sandwich" of sorts. Plus, you can use the hole in the CD as a hanger for your mirror. Super easy!

BTW, check out the wedding section at your local craft store for the mirrors. I found mine there, a two pack and they had beveled edges. They were packaged as "candle chargers". Less than $5 total for the two of them w/my handy dandy 40% off coupon.

To get the beaded look (if you want too), slide plastic pony beads onto the skewers. I used two different sizes, to vary the look a bit. I used jumbo skewers, so this worked really well and I didn't even have to hot glue the pony beads in place. You might have to use a bit of force to get the beads to slide, but it can be done. If the skewer is a bit long, you can cut the end off or leave it like I did.Before attaching the "skewer sandwich" to the mirror I spray painted it. Those skewers are thirsty and suck up the paint, so if you don't prime them (like I did) then you'll need several good coats. Also, the pony beads to need to be sprayed well so the colors don't show through. I didn't spray both sides completely as you can see but I did spray the beads from the front and back.

Total cost? Under $5! Used less than a pack of the skewers (from the dollar store), a few random pony beads (I raided my daughter's stash), the mirror was $2.5o and I used about 3/4 of a can of spray paint that was $1.97. Not bad at all I say!

Linking up for the first time to Funky Junk Interior's Saturday Night Special: http://funkyjunkinteriors.blogspot.com/

and to Kimba's DIY Tuesday: http://asoftplace.net/


giveaways

Thursday, February 11, 2010

Personalized Art Kits for Kids

This Christmas, I made my daughter her very own personalized art kit. I took one of those prefab art kits for kids, the ones you find every holiday season at pretty much any store for around $5. They are great! I buy one every year, that is about how long they last.

I wanted to make it extra special this year, so I decided to personalize it for her. I took poster board and cut it to fit the front of the kit. I then took just a small amount of my huge stash of scrapbooking stuff and went to town. I wanted it to look girly and cute. Plus, with my daughter the pinker the better.

I made sure to write cute sayings and such to inspire the little artist in her. But, I don't need to inspire this kid much...she'd draw on any flat surface in the house if I'd let her.

I glued it all down to the poster board with a glue stick, then went over everything with a good layer of Mod Podge. Once dry, I finished off the border with some ric-rac and grosgrain ribbon. Then I used my hot glue gun and heavily glued the backside of it and attached it to the art kit.

If it makes it semi-intact 'till next Christmas I'll be thrilled. So far it looks ok, considering she's used it probably 20 times since she got it.

I bought several kits and have them set aside, I see some birthday gifts for a few of her friends being made by yours truly in the near future. That with a nice pad of drawing paper, what a great gift that'll definitely be used. I'm all about the consumable gift lately.

Linking up to Kimba's DIY Tuesday: http://asoftplace.net/


Linking up for the first time to "Strut Your Stuff Thursday" at Somewhat Simple:
giveaways
BWS tips button

Wednesday, February 10, 2010

Valentine-ish Votive Holder


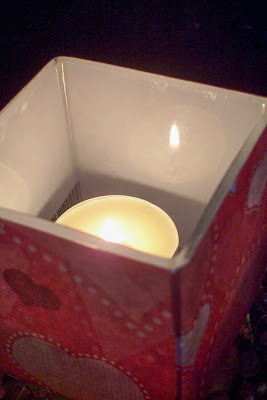
So I've had a set of clear glass square votive holders for forever. You know the ones, they are at every dollar store in the United States. Normally I'd use them at Christmastime, but I wanted to figure out another use for them.

I had some scrap pieces of scrapbook paper with a cute Valentine feel, so I used the scraps and made the above cute little votive holder. I simply Mod Podged the pieces directly to the votive holder, simple as pie.

I had a beaded candle ring that wasn't being used so I set the votive holder on top and it makes it pop all the more. Super simple, super cheap and that's the way I like it.

Word of caution, see how you can see the barcode from the scrapbook paper faintly above? Make sure you don't use that part of the scrapbook paper since when it's lit the paper takes on a bit of a transparent quality. But on the other hand, don't you love how the solid white back of the paper looks on the inside? Makes it look almost like cased glass to me.

You could make many variations for different holidays. What a great way to use up extra scrapbook paper too!

Please click on "Linky Parties I Love" on the right to see who'll I be sharing this project idea with.

Monday, February 1, 2010

Hand Dipped Chocolate Caramels


Make a sweet for your sweetie this Valentine's day. How about hand dipped chocolate caramels? Couldn't be simpler, honestly!!

Buy some chocolate melting disks (I like Guittard's best), Kraft caramels, and some various toppings. I used toasted coconut, sea salt and non-pareils for mine. Melt the chocolate according to manufacturers directions, dip the caramels until completely coated and top. See...super easy!

I bought cake boxes from the wedding section at Joann's for my candy boxes. Larger and much cheaper than candy boxes. Cut parchment paper to fit, and shredded some red and pink tissue paper to pad the box. Put my candies in little paper cups, filled the box and then tied off the top with some organza ribbon and a cute heart sticker.

Cut some cute scrapbooking paper or cardstock to decorate the outside of your box. I cut a small section of grosgrain ribbon and glued it to the top of the box, then added a cute layered sticker. Your love will appreciate your loving gesture, go and make some (make sure you buy too much so you have to eat the leftovers, don't forget to share with the kids!).

Linking up to Kimba's DIY day: http://asoftplace.net/ and Hoosiers Homemade Valentine's Party!: http://hoosierhomemade.com/

Monday, January 25, 2010

Be My CD Valentine


So right now I'm all about compact, small and easily packable holiday decorations. Don't get me wrong, I love big 'ol wreaths and elaborate decorations. However living in a 750 sq ft (yes...you read that right) home requires some space efficiency on our part. So while I love decorating for various holidays I simply don't have the space for storing lots of large decorations. Hence, the small and easily packable decorations.

I decided to use Cd's (scratched, or ones I don't listen to anymore) and made fun Valentine decorations. I went with the round shape of the CD as my inspiration for the fun sayings, stamped onto cardstock. I used spray adhesive to adhere scrapbooking paper directly to the Cd's, and then decorated them with various Valentine scrapbooking embelishments I already had. You could also make a cute and unique "card" for a loved one for Valentine's day (Hubby is getting one).

What else could you do with these? Think about the cute and fun birthday cards you could make using the same technique.

Once again, linking up to Kimba's DIY Tuesday: http://asoftplace.net/

Also linking up for the first time to Hoosier Homemade's site, she's having a fun Valentine's Party!: http://hoosierhomemade.com/

Tuesday, January 19, 2010

Coffee Mug Wall Art


Bought these super cute coffee mugs, $1 each brand new! Heavy stoneware with an awesome iridescent glaze, almost reminds me of carnival glass. Anyhoo....guess who broke one? I was soooooo ticked. Almost tossed the mug, but then noticed how it almost broke in perfect halves.
Hmmmmmm....so, I made art out of it!
Spray painted a frame, not well I might add. Then grabbed some coordinating scrapbook paper and Mod Podged it to the outer portion of the mat. Left the inner part alone, and then I hot glued the mug directly to the wooden frame backer. I liked the texture and rustic finish on the backer board a lot, think it adds some dimension. I'm so happy I didn't toss the mug!
I'm linking up to Kimba's DIY Tuesday (again!): http://asoftplace.net/
P.S. Forgive my horrible photos, camera wan't cooperating at all today!


Saturday, January 16, 2010

Vintage Kitty Plaque

Made this plaque for a little gal we know for her b'day. I love how it turned out, my first shot at one.

I used a kids cheapie chalkboard from the dollar store as my "plaque". Spray painted it white and then I was off! Downloaded the kitty and the label from The Graphics Fairy. The rest was all scrapbooking materials, except for the wax seal which I made (I'll show a tutorial on that someday).

I'm linking up to Brag Monday on The Graphics Fairy: http://graphicsfairy.blogspot.com/
and to DIY day at Kimba's: http://asoftplace.net/
BWS tips button

Tuesday, January 12, 2010

Welcome Blessings Wreath

My beloved rooster wall clock finally died. So sad. Instead of chucking it, I made a wreath.

I was going to try and buy a new movement for the clock, but after buying one that didn't fit I didn't want to mess with it any longer.

My door looked lonely since I packed my Christmas wreath away, so I decided to make it a new friend. I think it turned out pretty cute. Had everything on hand, didn't spend a dime. Yea!!

Linking up to Kimba's DIY Tuesday: http://asoftplace.net/

Tuesday, November 24, 2009

Tiny Turkey Handprints

Every year I make these with the kids, it's fun and super easy. I like it because it also is a neat way to chronicle their growth, since their hands get bigger every year! It's also super cheap, which is also a plus with kids crafts. I try and make them a little different every year for variety, and then I usually display them on the backside of the front door. They are made out of brown grocery bags, feathers, fake leaves, construction paper, googly eyes, pom poms, etc. Usually whatever I can find lying around the house.
This is the first year we made them.
This is last years edition.
This is the one we made this year. I also took the materials to a playgroup we belong to and we made them, the kids had fun. I love making little things like this with the kids, and it's great that it can be used as part of our decorations too!
I'm linking up again to Kimba's DIY Tuesday! http://asoftplace.net/

Monday, November 23, 2009

DIY Dollar Store Designer Print

I've found some really cute removable decal/wall sticker at the dollar store. I used the one below in a family photo display I created in the living room. They are great, since we rent we can't do anything permanent, so this is a great way for us to personalize our home without it being an issue when we move. Below is a partial picture of the "family wall".The other day I found another really cute decal that I wanted to use. However I didn't want to stick this one directly on the wall, but figure out a way to frame it. The size was oblong, I didn't want to buy a frame since it would probably be more than I wanted to spend. So I was looking around the house and found this picture. It was hanging on the wall, but I decided to kidnap it for my project and replace it with something else.
I had some grass cloth wallpaper already, so I cut it to fit inside the frame of the picture. I didn't remove the old picture, just cut the wallpaper to fit over the glass on the frame. Then pulled out my handy dandy glue gun and glued the wallpaper directly to the glass. Then I centered my decal. All there is to it, new picture for $1! I think it turned out pretty cute, and I love the fact that I didn't have to buy anything additional.
Here it is hanging in the living room. There is a torchier lamp behind the screen, when it's turned on at night it looks really pretty and makes the picture really pop.

I'm linking up to Kimba's DIY Day! http://asoftplace.net/

Sunday, November 15, 2009

DIY Herbal Bath Tea Bags

I saw this in a blog the other day and wanted to make some for bath baskets I'm working of for Christmas http://www.sarahsbluecastle.com/blue_castle/2009/11/handmade-gift-bath-tea-you-can-make.html However, I didn't have the tea balls and would need to purchase them. Trying SUPER hard to be creative with what I have on hand for gifts this year. Scrounging around, I found some long lost cheesecloth I've had for years and never opened. So, I decided to make "tea bags" instead. Me thinks they turned out pretty nicely. Here's what I did:
I grabbed my "tools" which were peaking shears, a hole punch, cheesecloth, ribbon, a permanent marker and some pre-cut card stock circles (left over from another project).
I dumped a bunch of herbs in a bowl. I used rosemary, basil, dill and bay leaves. The rosemary and basil leaves were a bit past prime, but still had a nice smell so I am excited I found a use for them instead of cooking.
I cut a rectangle of cheesecloth, triple layered. I was going to just double it, but since the rosemary and bay leaves are a bit "pokey" I didn't want them to snag and rip the cheesecloth. I then tied it up with my ribbon and threaded my card stock tag through before knotting off the ribbon.
I made seven bags in all, perfect for the two bath sets I'm working on for gifts this year. I think they turned out pretty cute, and best of all I didn't spend anything since I used things I already had on hand. Yipee! I'm linking my project up to Kimba's DIY Tuesday! http://asoftplace.net/


Monday, November 9, 2009

Improvised Inspirational Art

This is the unfinished bedroom art that I'm currently working on. I still need to mount the fabric to the wooden frame backer and then I'm going to center the picture in the middle. I'm really excited, I think that I'll turn out really cute when I'm done. I've been trying to figure out a way to reuse an old picture frame and that is what I've done here, total cost of project is under $20! I'll try and post a picture when I'm totally done. Here's a semi "tutorial" on what I did.
The picture frame was originally birch. I painted it white (Antique white from Kilz, left over from my bathroom redo). I then painted the inside of the frame chestnut brown with some acrylic craft paint. I took that same brown and mixed it with some candy apple red acrylic craft paint and then gave it this streaked, worn looking finish.
I found this adorable cabbage rose flannel fabric in the remnant section at JoAnn's. It was approximately 20x24, under $1.50! I'll have a little bit of left-over fabric that I can use for something else.
This is the original picture I started with. It's a metal wall plaque that I got from my new favorite local home/garden shop. I really like it, but when I hanged it up I knew that it wasn't substantial enough and needed something more. Hence my "improvised" inspirational art!
I'm linking up to Kimba's DIY Tuesday! http://asoftplace.net/